
Overview
We now proceed with Part 2 of our tutorial on how to send large files through email. In Part 1, we introduced you to a secure, reliable, and efficient method of sending big files through trusty old email. We called that method ad hoc file transfer. Today, we start getting technical as we show you how to set up the ad hoc file transfer service on your JSCAPE MFT Server. This won't take long, so just sit back, scroll down, and discover the handful of settings that will free your users from the file size limitations of email.
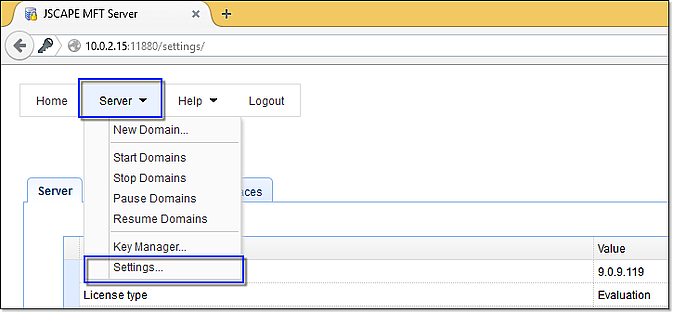
1. Navigate to your server settings
Launch your JSCAPE MFT Server Manager and navigate to Server > Settings.
2. Enable the Email Service
Go to the Email > Email tab and then check the Enable email service check box.

You can now start configuring the required settings for your email service:
Note: You might need to contact your SMTP server administrator to obtain the values you need to enter here.
Host/IP - This is the hostname or IP address of your SMTP server. (e.g. smtp.myserver.com, smtp.gmail.com, etc.)
Port - This is the port number of the SMTP service. (e.g. 465)
Connection type - Here, you'll be asked to choose between plain, SSL, and start TLS.
Username - Not all SMTP servers require this. But if your SMTP service requires authentication, then you'll need a user account there. This should be the username of that user account.
Password - This is just the corresponding password of the username you just entered earlier.
Just leave the Debug file field empty for now.
For the MESSAGE settings, the From field is where you'll enter the (optional) From address when sending emails. Note that this may be overriden by the user who'll be performing the actual ad hoc email transfers.
You may leave the Reply To field blank for now as well.
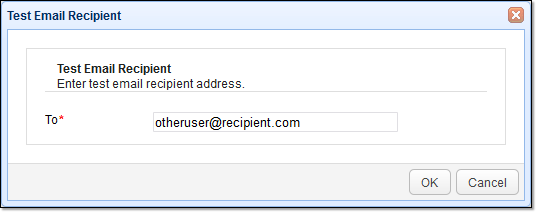
To make sure everything's fine as far as the connection to the SMTP server is concerned, click the Test Server button. You can find this at the bottom-right corner of the screen. This action will send out a test email message to an email address of your choosing.
You'll see something like this when you click on the Test Server button. You'll then be asked to enter the email address where the test email message will be sent. Just use one of your own so you can easily verify whether the message was received.
If the test was successful, an "Email server test passed" message box will pop out of the screen. Click OK to proceed.

You can verify this further by checking the inbox of the email address you entered as your Test Email Recipient. If the test was really a success, you should be able to find a message that says "This is a test message sent from JSCAPE MFT Server". Double-check your Spam folder in case you don't find it in the inbox. Sometimes, it can also take a couple of seconds before reaching your inbox, so be patient.
What we've done so far is just enable our Email Service. We can't send large files through email yet. In order to send large files through email, you need to enable your ad hoc file transfer service.
3. Enable your Ad Hoc File Transfer service
Go now to the Ad Hoc File Transfer tab and check the Enable ad-hoc email transfers check box.

Although you can simply accept all the default values to activate the ad hoc file transfer service, I'd like to briefly discuss some of the salient features on this panel.
Link expiration range - When a user sets up an ad hoc file transfer, he'll be able to specify the number of days until the download link will expire. Setting an expiration period for download links can add a layer of security. Once the link expires, no one (not even the recipient) will be able to download the file by clicking that same link. The link expiration range will allow you to increase or decrease the range over which the expiration period can be set at the client side. The more sensitive your users' files are, the more narrow this range should be.
Max downloads default - If maximum downloads are enabled then this is the default value supplied in web interface.
Enable password protection - If checked, end users will be able to protect their links with a password. Links can be copy-pasted and shared to other users. But without the password, a user won't be able to download the file.
We'll discuss the other settings in another post. You now have enough information to get you started with ad hoc file transfer.
Read How to Send Large Files Through Email Part - 1, 2, 3, 4
Want to follow the steps on this post? I suggest you install and test-drive the free, fully-functional evaluation edition of JSCAPE MFT Server now.