
For several decades, SFTP, which stands for Secure File Transfer Protocol or SSH File Transfer Protocol, has been arguably the most widely used solution for transferring sensitive data across the internet. In the past few years, however, we’ve seen increased adoption of what’s known as SFTP cloud.
Also known as “cloud SFTP,” this innovation to an otherwise well-established technology offers new benefits to organizations that transfer sensitive data in their business processes. So, what exactly is SFTP cloud, and how do you use it?
What is cloud SFTP?
Cloud SFTP refers to any secure file transfer solution that combines SFTP with cloud-based services. In most cases, these services are for cloud storage. This combination enables businesses to implement file transfer workflows while taking advantage of the benefits of both SFTP and cloud characteristics like scalability, high availability, minimal upfront cost, flexible pricing and global access.
Recommended read: Amazon S3 vs. Local Storage – Where Should You Store Files Uploaded to Your File Transfer Server?
Cloud SFTP use cases
Businesses are discovering many ways of leveraging SFTP cloud solutions. Here are some popular use cases that you might find suitable for your organization:
Cloud-based data backup and archiving
You can connect your secure FTP server to a cloud storage service and use the virtually unlimited storage capacity of the cloud for backing up and archiving files uploaded to your server. This setup can significantly reduce the risk of data loss. Not only can you keep copies of your files in an offsite location, but you can also store them in a robust infrastructure that’s backed by multiple levels of redundancy.
Pro Tip: Schedule automated backups from your SFTP server to your cloud storage outside office hours to minimize network congestion.
Integration with cloud-based applications
When you upload files from your SFTP server to a cloud storage service like Amazon S3, you’ll be bringing those files closer to cloud-based applications. These applications can be cloud-native apps or regular apps hosted in a cloud-based virtual machine (VM). Once you grant those cloud-based applications access permissions to your uploaded files, those apps can then do all sorts of things with them, such as processing, analyzing or simply viewing their contents.
In effect, the SFTP cloud solution serves as an enabler for hybrid cloud integration.
Secure remote access to files stored in the cloud
Once you have files stored in the cloud, authorized users can access those files remotely and securely through SFTP clients.
This type of authentication requires connecting parties to have valid user accounts and to authenticate using a password and an SFTP key Combined with data-in-transit encryption, this two-factor authentication mechanism significantly reduces the risk of unauthorized access to your cloud-based files, including man-in-the-middle attacks (MITM).
You can implement an SFTP solution cloud in multiple ways, and we’ve highlighted three major approaches below.
Approach #1: On-premises SFTP server that uses cloud storage
The first option is to deploy an SFTP server on-premises and then connect that SFTP server to a cloud storage service like Amazon S3, Microsoft Azure Blob Storage or Google Cloud Storage. One advantage of this setup is that your SFTP server is stationed in close proximity to your on-premises applications. If most of your data transfer workflows are carried out locally, putting your SFTP server on-premises can reduce performance issues caused by network latency.
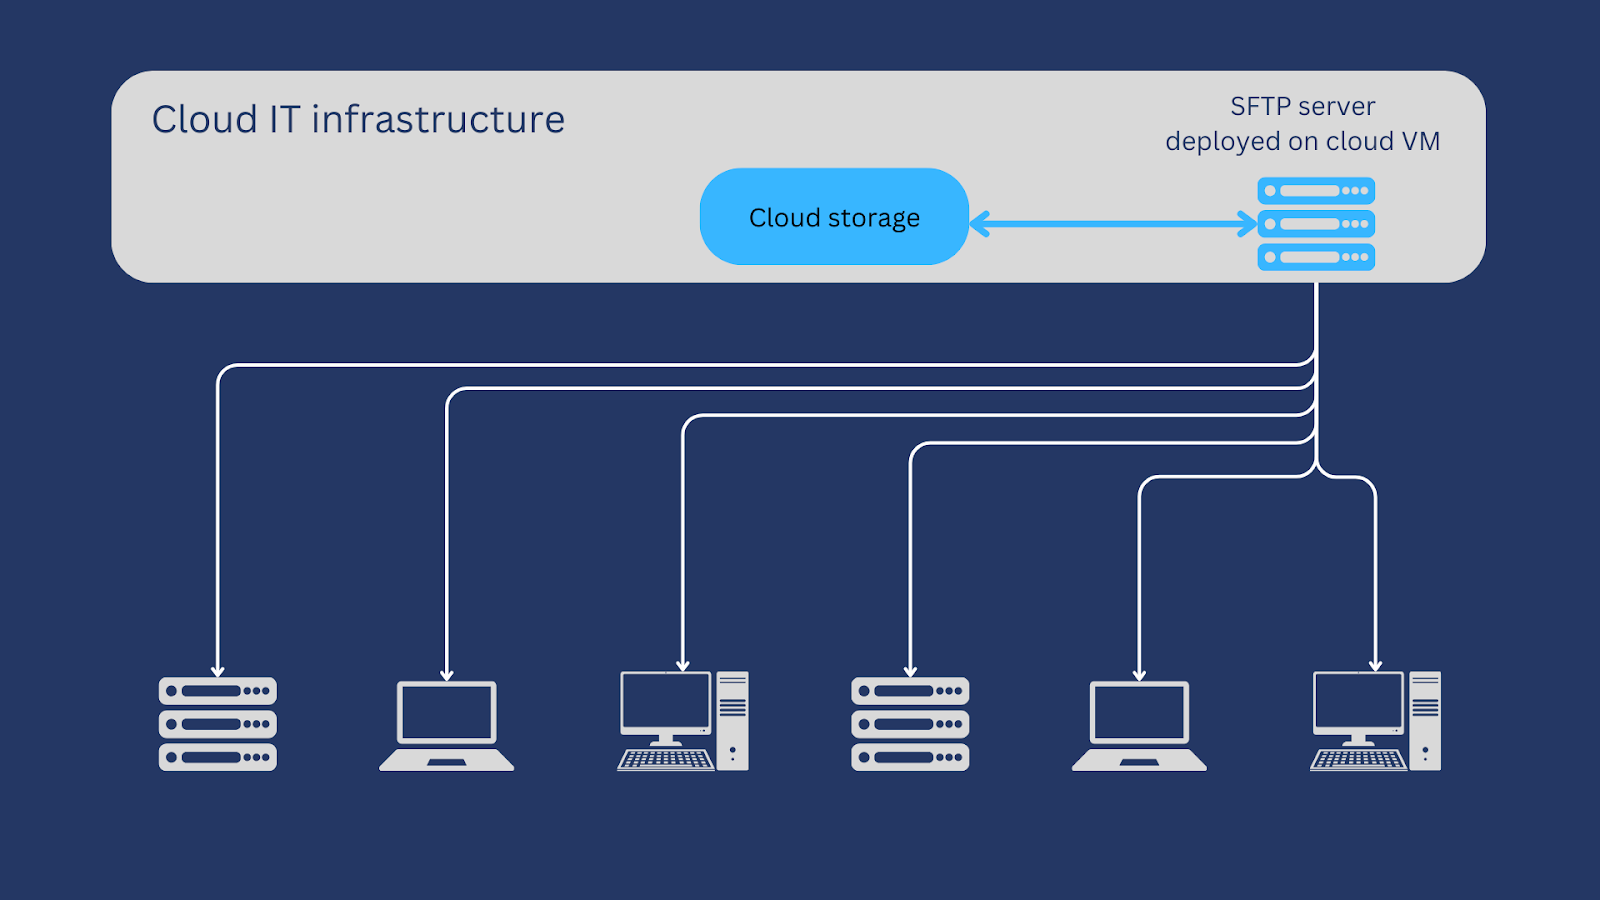
Approach #2: SFTP server on a cloud-based VM
Another way to approach this is to deploy your SFTP server on a cloud-based VM, e.g., an Amazon EC2 instance. In other words, both your SFTP server and your storage can benefit from cloud characteristics like flexible pricing, scalability and so on.
Approach #3: SFTP delivered as a cloud-based service
In the other two cloud SFTP setups discussed earlier, you’re responsible for deploying, managing and maintaining your SFTP server. In fact, in the first approach, you’re also responsible for deploying, managing and maintaining your physical server and network.
Approach #3 is much easier to handle from an IT administrative standpoint, as it only involves subscribing to a cloud-based SFTP service delivered under a Software-as-a-Service (SaaS) model. As with all SaaS solutions, this approach greatly reduces your capital expenditure (CAPEX) while offering flexible pricing.
Comparing approaches and their administration responsibilities
The matrix below sums up your administrative responsibilities for the three different approaches to implementing an SFTP cloud solution. With the exception of the “SFTP application configuration,” these admin responsibilities typically involve deployment, management and maintenance.
| Administrative responsibilities | Approach #1 | Approach #2 | Approach #3 |
|
Physical server and network |
✅ | ||
|
Server operating system |
✅ |
✅ | |
|
Cloud storage |
✅ |
✅ | |
|
Cloud-based VM and virtual network |
✅ | ||
|
SFTP application |
✅ |
✅ | |
|
SFTP application configuration |
✅ |
✅ |
Your organization’s specific business needs will help you decide which approach is the best. That’s why it’s better to choose a solution that supports multiple use cases and different approaches.
Why use JSCAPE for your SFTP cloud implementation
JSCAPE by Redwood is a managed file transfer (MFT) solution that enables you to implement SFTP cloud through each of these different approaches. Here are the key reasons why you would want to use JSCAPE for your SFTP cloud project:
Enables all three approaches to cloud SFTP
JSCAPE supports all three approaches to implementing an SFTP cloud. You can use JSCAPE MFT Server by Redwood if you wish to deploy JSCAPE on-premises or on a cloud-based VM. Alternatively, you can use JSCAPE SaaS if you prefer to do away with the administrative overhead and the upfront costs associated with the other two approaches.
Deploy anywhere: From on-premises to Docker containers
A key advantage of using a dedicated solution like JSCAPE MFT Server is its deployment flexibility, which ensures it fits into any modern IT strategy. While you can install it on a traditional Windows or Linux server, either on-premise or on a cloud VM, JSCAPE is also fully optimized for modern infrastructure.
JSCAPE MFT Server can be run inside a Docker container, which provides significant benefits including:
- Rapid deployment: Spin up new, fully functional SFTP server instances in seconds, allowing you to quickly respond to new business needs or create sandboxed test environments.
- Scalability and automation: Integrate JSCAPE into your DevOps workflows and CI/CD pipelines. Use container orchestration tools like Kubernetes to automatically scale your file transfer capacity up or down based on demand.
- Ultimate portability: Run the exact same SFTP configuration on a developer’s laptop, in your on-premise data center or across any public cloud like AWS, Azure or Google Cloud, without modification.
This ability to be containerized means JSCAPE not only solves today’s cloud integration challenges but also aligns with a future-proof, infrastructure-as-code strategy.
Supports all major cloud providers
If you choose approach #2, your SFTP cloud implementation would be simple. That’s because JSCAPE readily supports all major cloud providers, including Amazon Web Services (AWS), Microsoft Azure and Google Cloud. You can easily deploy JSCAPE on cloud-based VMs on any of those three cloud environments and then integrate the cloud-based instances with cloud storage services native to those environments.
Simplifies integration through a robust API and connectors
JSCAPE simplifies integration by providing a robust API and an extensive range of connectors in the form of trading partner and network storage objects. Some of the cloud services JSCAPE readily integrates with include:
- Amazon S3
- Box
- DropBox
- Google Drive
- Google Cloud Storage
- IBM Cloud
- Microsoft Azure Blob
- Microsoft Azure Data Lake
- Microsoft Azure File
Supports other file transfer protocols
In addition to SFTP, JSCAPE supports other protocols, such as File Transfer Protocol Secure (FTPS), Applicability Statement 2 (AS2), Odette File Transfer Protocol (OFTP2), Web-based Distributed Authoring and Versioning Secure (WebDAV) and many others. This means you can create similar hybrid cloud solutions by combining these services with cloud storage.
Provides comprehensive protection through an array of security features
JSCAPE is known for its comprehensive selection of security features, which augment SFTP’s built-in security controls. Some of these features include the following:
- PGP data-at-rest encryption
- Multi-factor authentication
- File, user and virtual path permissions
- IP address-based access control
- Malware protection
- Audit logs
- Data Loss Prevention (DLP)
- Single Sign On (SSO)
- And many more
Streamlines regulatory compliance initiatives
JSCAPE’s vast selection of security features can greatly simplify regulatory compliance initiatives. You can leverage these features to meet several regulatory requirements mandated by data protection laws and regulations, such as the Health Insurance Portability and Accountability Act (HIPAA), European Union General Data Protection Regulation (GDPR) and Payment Card Industry Data Security Standard (PCI DSS).
Provides extensive management and monitoring capabilities
JSCAPE’s intuitive administrative web interface features an array of management and monitoring capabilities that give you full control over your file transfer and file-sharing activities.
Metrics include system resource utilization, connections, uploads, downloads, external uploads, external downloads, logins and triggers. The information provided can help you make informed decisions about making the necessary adjustments. For instance, you can set user quotas to make more efficient use of your bandwidth, or you can set notifications that are triggered when certain levels are reached.
Offers low-code/no-code automation functionality
To respond to file transfer-related events in real time, organizations automate tasks whenever they can. If you plan to incorporate your SFTP cloud solution in business process automation projects, JSCAPE can simplify that with its low-code/no-code automation functionality that allows you to quickly configure automated SFTP workflows through an intuitive drag-and-drop interface.
Frequently Asked Questions
Why do businesses seek cloud file transfers?
Businesses seek cloud file transfers to take advantage of cloud technology characteristics like scalability, cost efficiency, reduced capital expenditure, high availability, flexible pricing and global accessibility. Cloud transfer solutions help your organization easily share files, maintain version control and reduce the risk of transferring outdated files. Get a demo to see how your organization can improve its internal collaboration with a cloud file transfer solution like JSCAPE.
Is SFTP cloud-based?
Although some software vendors and cloud providers now offer SFTP as a cloud-based service, SFTP originated as an on-premises secure file transfer solution. SFTP servers are usually deployed in a company’s office or hosted in a data center. However, with the rise of cloud technology, SFTP is increasingly being delivered as a cloud-based service. This allows for easier access, scalability and cost-efficiency for businesses.
Is it also possible to have a cloud-based FTP server?
Absolutely. While most cloud service providers will probably not offer a cloud-based FTP service, you can configure your own FTP cloud solution using JSCAPE. As discussed earlier, JSCAPE supports several file transfer protocols This includes FTP and its secure version, FTPS. Discover seven alternatives to an SFTP platform.
What is cloud SFTP?
Cloud SFTP is a secure file transfer solution that combines its functionality with cloud-based services like cloud storage. This empowers your organization to implement file transfer workflows that are cost efficient, secure and easy to access. JSCAPE is a solution that your business can leverage across multiple cloud-based file sharing approaches like combining SFTP with cloud storage, a cloud-based VM or a cloud-based service.
How can I tell which approach is best for my organization?
Consider your organization’s business needs when choosing the best approach to implementing cloud SFTP. If most of your data transfer workflows are local, using an on-premises SFTP service might reduce network latency. If your organization already heavily relies on cloud services, using an SFTP service on a cloud-based VM might be more suitable. If you want to minimize administrative responsibilities and reduce upfront costs, using an SFTP service delivered as SaaS might be best. Our experts can analyze your organization’s specific needs and recommend the architecture and file transfer configurations that will provide the best support. Request a demo today and get consultative advice for your organization.

