
In this tutorial, you’ll learn the basic steps for setting up an Applicability Statement 2 (AS2) server. While the final outcome will only be a rudimentary AS2 setup, the steps you’ll encounter along the way are crucial in understanding AS2 configuration concepts. That said, we’ll be sharing links to other AS2 tutorials as we move along. When you combine all these tutorials, you’ll be able to configure a server for production-grade AS2 workflows.
Defined in RFC 4130, AS2 is a relatively advanced file transfer protocol for sending electronic data interchange (EDI) messages. Because AS2 is designed specifically for exchanging structured business data in a secure manner, it’s a perfect fit for EDI. Since AS2 is so closely associated with EDI, we’ll be using the terms “EDI message” and “AS2 message” interchangeably throughout this tutorial.
Who needs to learn this?
Anyone given the responsibility to set up an AS2 connection but don’t know where to start will find this tutorial useful. While that person can be a seasoned IT administrator, being a highly experienced IT admin isn’t a prerequisite. You can follow the steps outlined here even if you’re a junior IT admin, IT generalist or even a small business go-to tech person.
AS2 setup prerequisites
In order to set up an AS2 connection in a test environment, you’ll need two AS2 servers. You’ll need the first AS2 server to send files and the second one to receive them. Unless you’re allowed to use your AS2 trading partner’s server for testing, you’ll have to set up both servers yourself. For this tutorial, we’ll be using JSCAPE MFT Server by Redwood.
If you wish to follow along, you may request a free trial of JSCAPE.
JSCAPE MFT Server runs on all major platforms, including Microsoft Windows, Linux, Oracle Solaris and IBM AIX, so you shouldn’t have any problem building a test environment for this tutorial. To install JSCAPE MFT Server, you can follow the installation instructions in the online documentation found here.
Alternatively, you may also use JSCAPE MFTaaS, also by Redwood. It’s JSCAPE MFT Server delivered in a Software-as-a-Service model. That means it doesn’t require any installation.
Once your two JSCAPE MFT Server instances are up and running, you may follow the steps below. Perform these steps on both server instances.
Create a user account
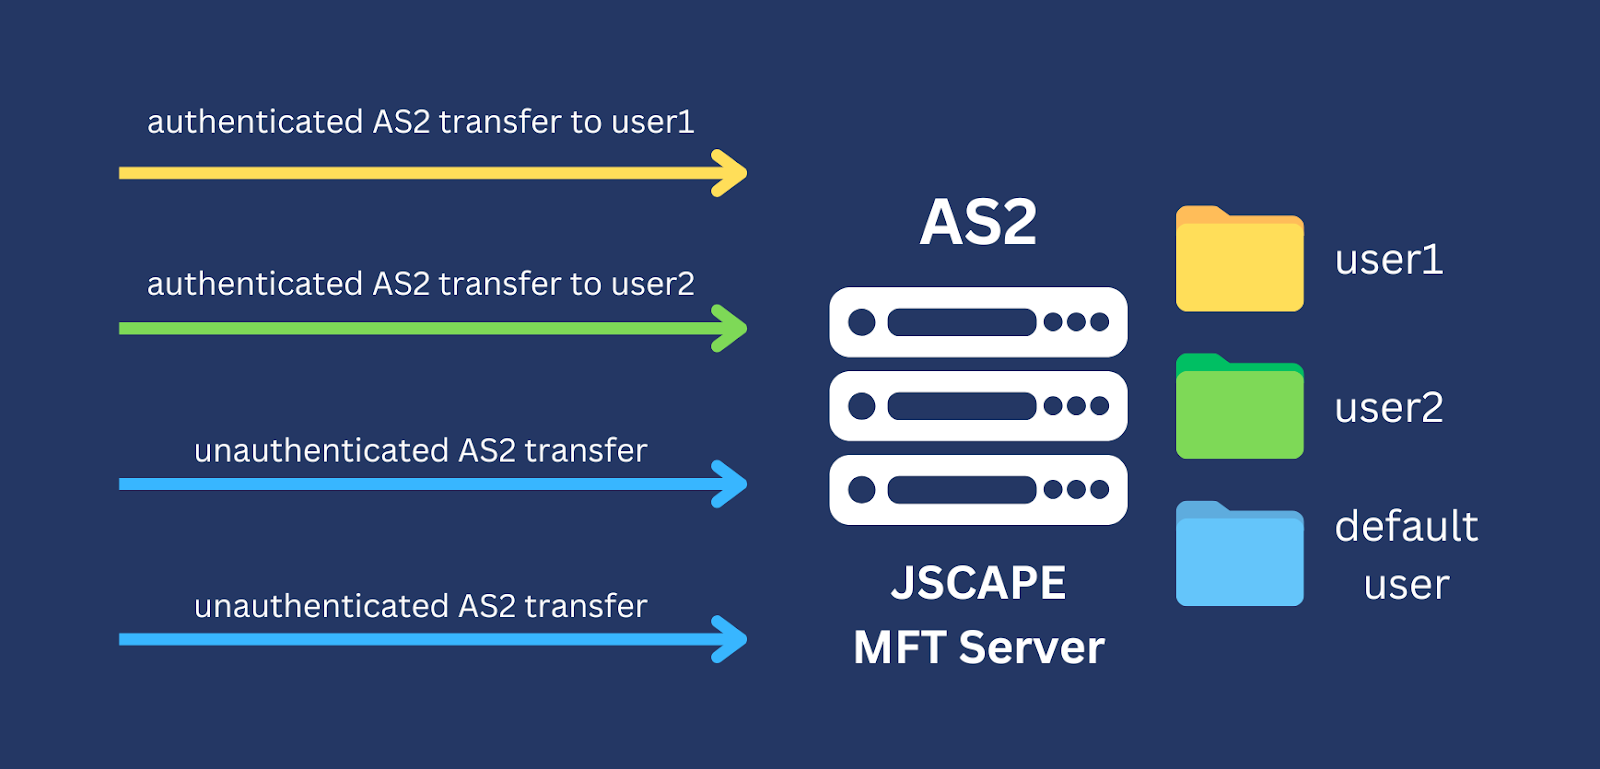
This AS2 setup won’t require any user authentication. However, you’ll still need to create a user account because all inbound files received through AS2 transfers are stored by JSCAPE MFT Server in individual user accounts.
All authenticated AS2 file transfers store files in the user account specified by the sending trading partner. On the other hand, all unauthenticated AS2 transfers store files in a default user account. The account we’re creating here will serve as that default user account.
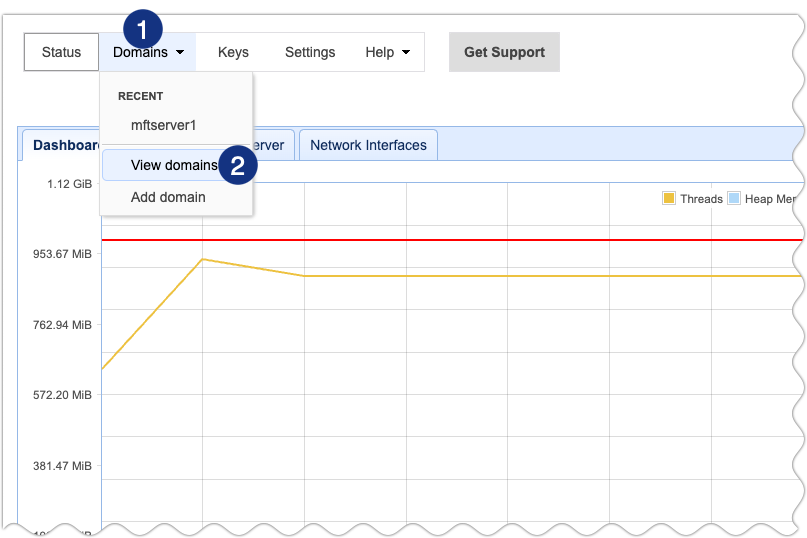
To create that default user account, login to your JSCAPE MFT Server instance and navigate to the domain where you wish to create the account. If you don’t have a domain yet, please follow the instructions on this page. Click the Domains menu located at the top of your screen. After that, click View domains.
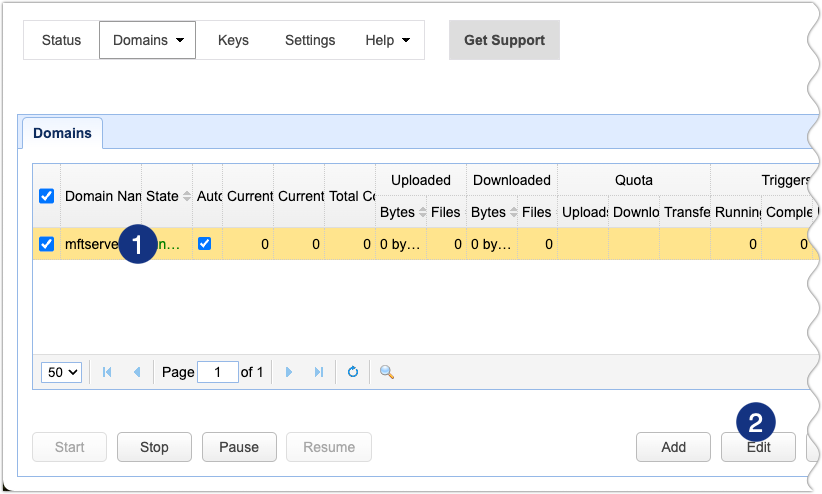
Select the domain in question and then click the Edit button.
Once you’re inside the domain, expand the ACCOUNTS menu and then navigate to the Users module. Create a new user account by clicking the Add button.

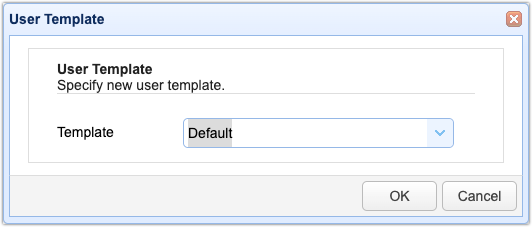
Choose a user template. For this example, just use the Default template. Click OK to proceed.
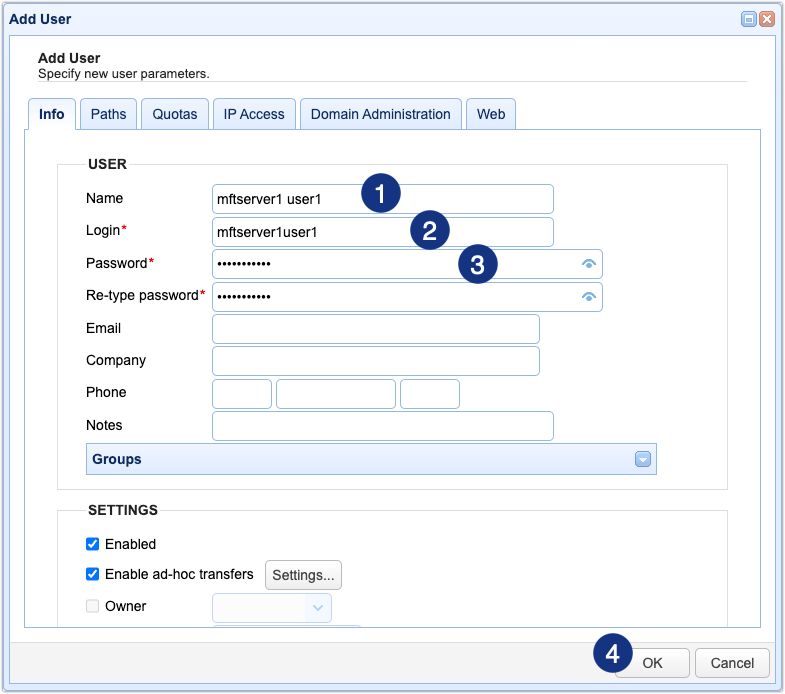
Fill out all relevant fields. This is just an example, so you can just fill out the following fields for now: Name, Login name and Password. Once you’re done, click OK to save your settings.
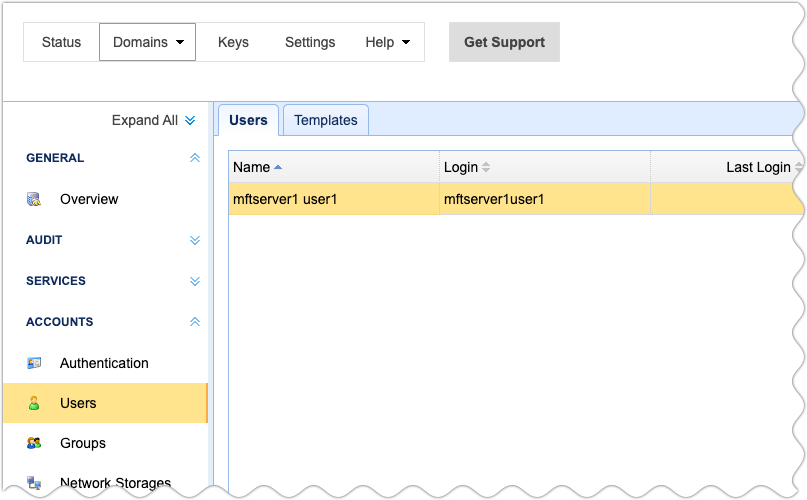
When you’re back at the Users tab, you should see your newly created user account.
Set up HTTP/S
One of the biggest advantages of AS2 is that it runs over Hypertext Transfer Protocol (HTTP) or Hypertext Transfer Protocol Secure (HTTPS). This means you can transfer any AS2 payload to any trading partner with internet connectivity.
However, to minimize risk in your AS2 file transfers, avoid using HTTP. HTTP transmits data in cleartext, making it susceptible to man-in-the-middle attacks (MITMs). If you’re not familiar with MITMs, read our blog post “How to Prevent Sniffer Attacks with Encrypted FTP.” It talks about a specific type of MITM that targets standard File Transfer Protocol (FTP), but the concepts apply to HTTP as well. Both FTP and HTTP transmit data in cleartext a.k.a. plaintext.
Instead of using HTTP, use HTTPS. HTTPS AS2 connections are protected by Transport Layer Security (TLS). TLS is a cryptographic protocol that supersedes the more popular but already-deprecated Secure Socket Layer (SSL) protocol. Both TLS and SSL encrypt data in transit, support certificate-based authentication and preserve data integrity.
To support all that functionality, SSL/TLS uses a combination of symmetric and asymmetric cryptography. Symmetric cryptography provides the main encryption and decryption mechanisms for the transmitted data. On the other hand, asymmetric cryptography, using pairs of public keys and private keys, protects the keys used for symmetric encryption/decryption and provides digital signature functionality.
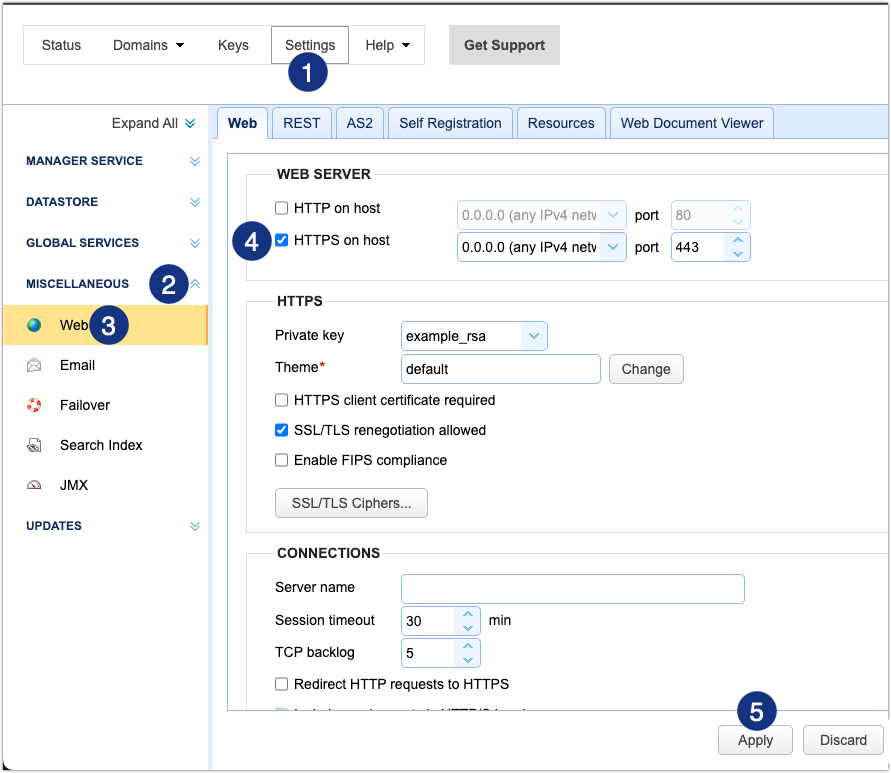
Before you can start setting up AS2, you have to enable HTTPS first. To do that, click the Settings menu, expand the MISCELLANEOUS menu and then select the Web module. After that, tick the “HTTPS on host” checkbox to enable HTTPS. Click the Apply button to apply the changes.
Once HTTPS is up and running, you should be ready to proceed with the main AS2 setup process.
Start your AS2 configuration
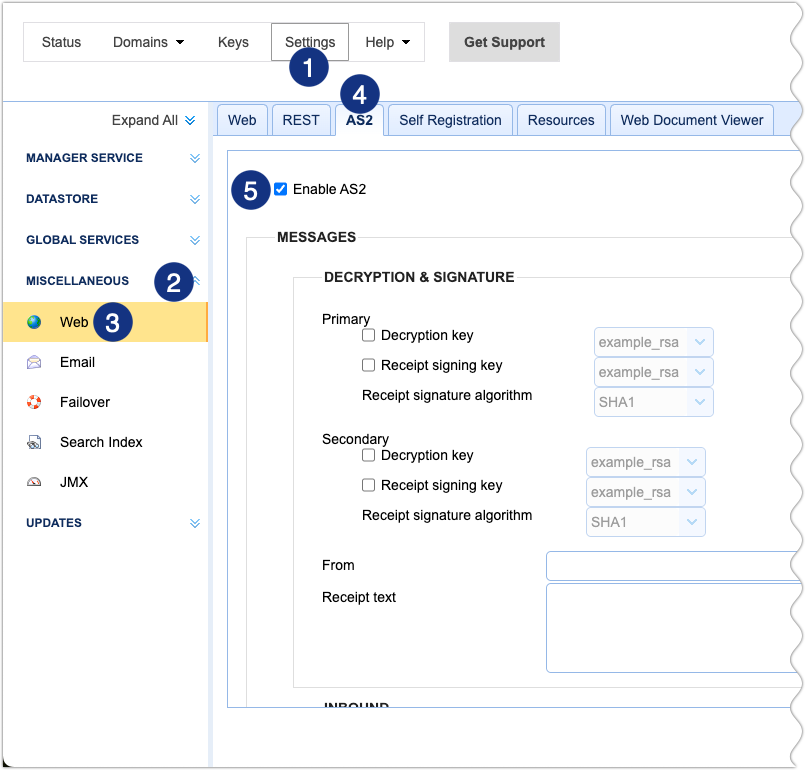
If you haven’t left the Settings module, you can simply navigate to the AS2 tab to start configuring AS2. Otherwise, go back to Settings > MISCELLANEOUS > Web and then click AS2 to view the AS2 settings. Next, tick the Enable AS2 checkbox to begin the AS2 configuration process.
Since we’re just after a basic AS2 setup, you can skip most of the settings on that tab and scroll down to the checkbox labeled “Bind unauthenticated transfers to domain.” Tick that checkbox and then select the following:
- The domain that contains the default user account created earlier (e.g. “mftserver1”)
- The username of the default user account itself (e.g. “mftserver1user1”)
All files and EDI messages received from inbound unauthenticated AS2 file transfers will be stored in the relative folder specified in the Upload directory field (e.g. /as2). JSCAPE MFT Server will create this relative folder under the default user account’s root directory. The Upload directory field is editable, so feel free to change the folder name if you wish.
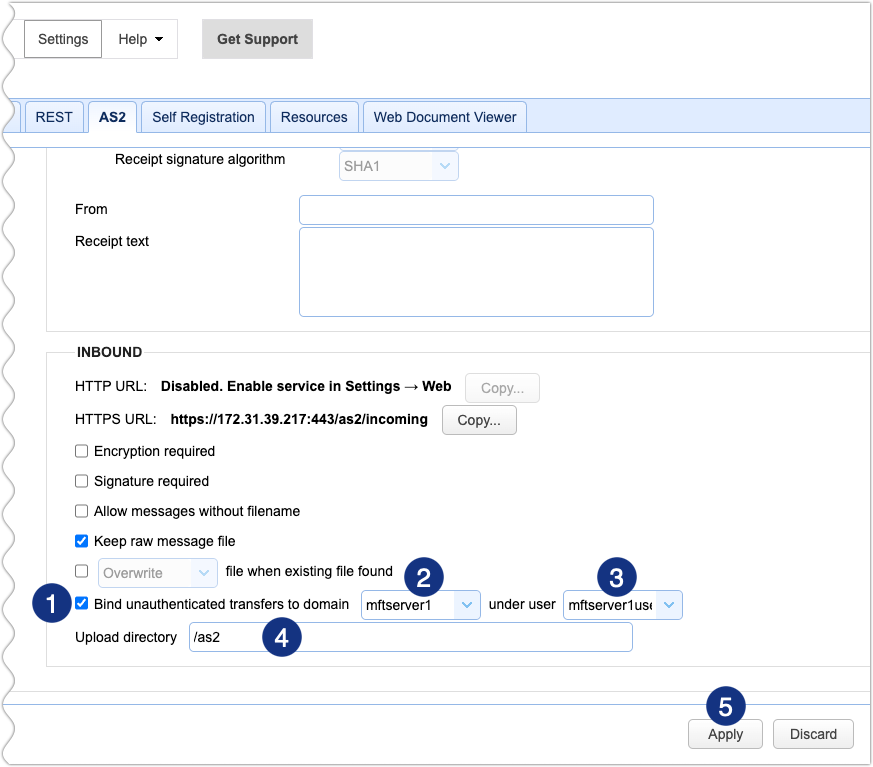
Click the Apply button as soon as you’re done.
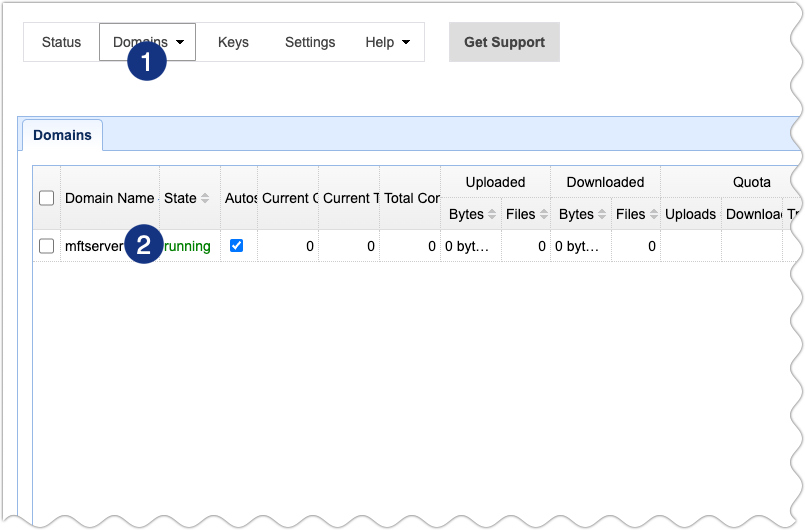
Although AS2 is already enabled for this server, you still have to specify which domain it should be listening on. To do that, expand the Domains menu and then click View domains. Next, double-click on the domain where you wish to add your AS2 listener.
Once you’re inside that domain, expand the SERVICES menu, select the Listeners module and then click the Add button.

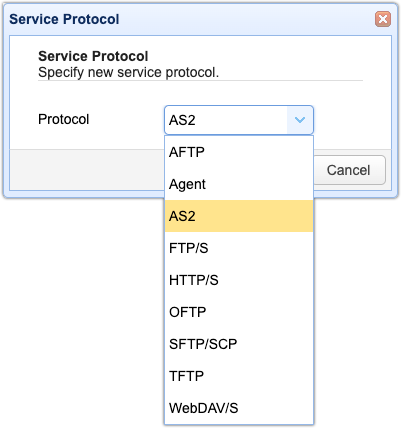
Next, expand the Protocol drop-down list and then click AS2 to select it. Click OK to proceed.
You’ll then be asked whether you wish to add the AS2 service through HTTP or HTTPS. Tick the HTTPS checkbox and then click OK.

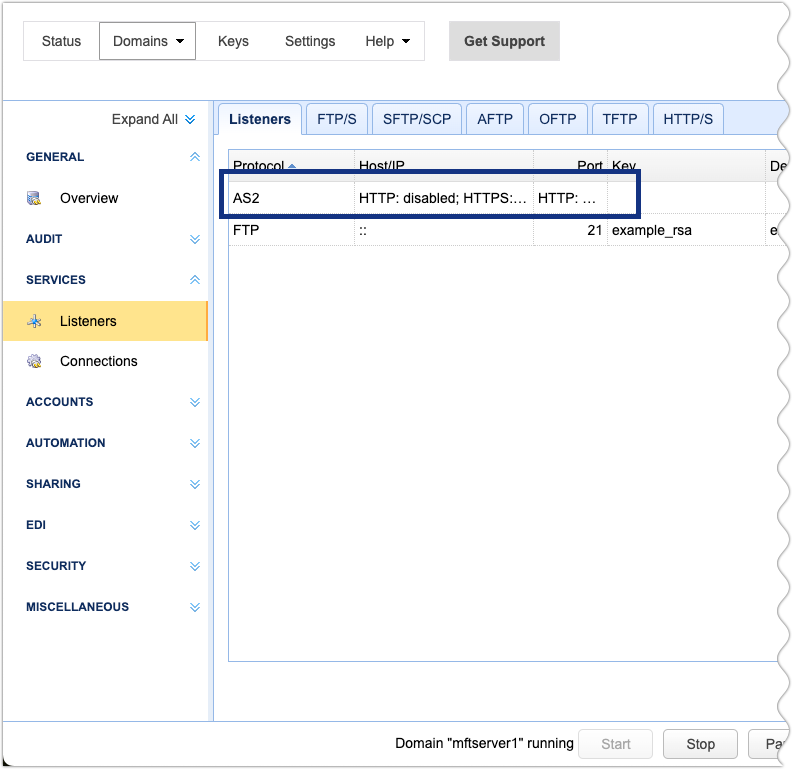
You should then see the newly added AS2 service under the Listeners tab.
At this point, your AS2 setup should already be capable of receiving AS2 messages. Now, since your server will also have to send AS2 messages itself, you’ll also have to learn the steps to equip your server with that capability.
Configure trading partner settings for sending AS2 messages
JSCAPE MFT Server courses outbound AS2 messages through what are known as trading partners. In the context of JSCAPE MFT Server, trading partners are virtual objects that encapsulate all the connection details and other relevant information about a specific physical trading partner. Here are a few introductory videos and articles that can help you get acquainted with JSCAPE MFT Server trading partners:
Using Trading Partners in JSCAPE MFT Server – Part 1
Using Trading Partners in JSCAPE MFT Server – Part 2
Preparing Trading Partner Servers for SFTP Automation
How To Set Up a Scheduled Automatic Download with a Trading Partner
Let’s now create an AS2 partner. In a production environment, you’ll likely transact with multiple AS2 trading partners. That means you’ll have to create at least one trading partner object for each of those AS2 partners.
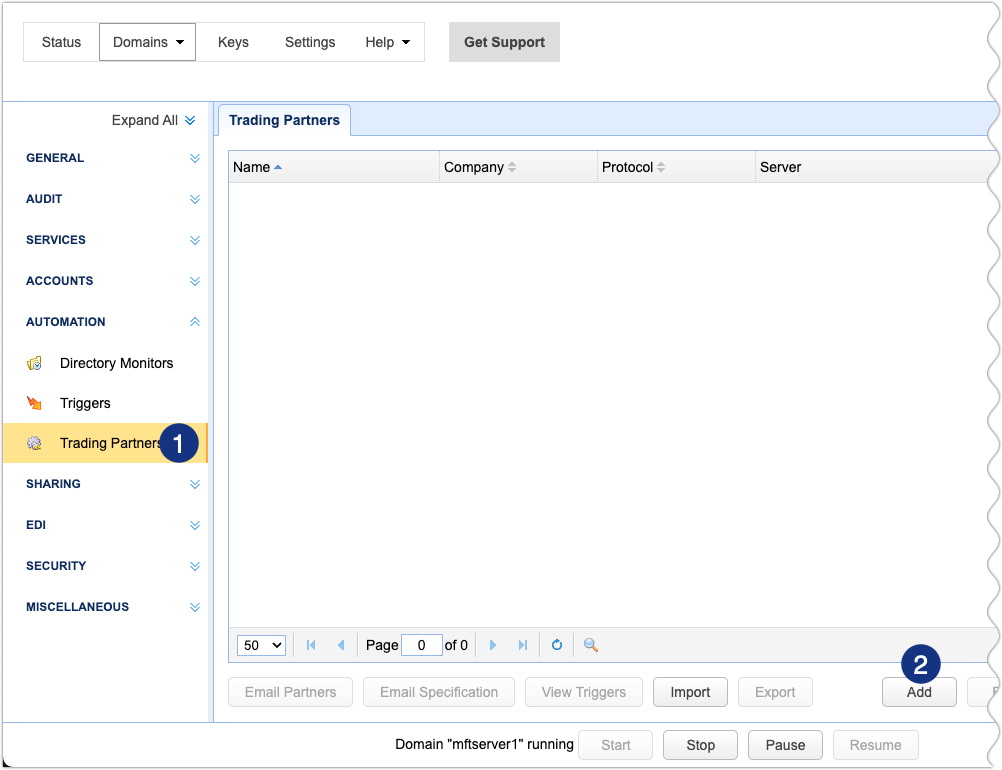
To create an AS2 trading partner, navigate into the same domain where you added that AS2 listener. If you’ve been following the instructions in the previous section, you should already be in that domain. Expand the AUTOMATION menu and then click the Trading Partners module. After that, click the Add button to add a new partner.
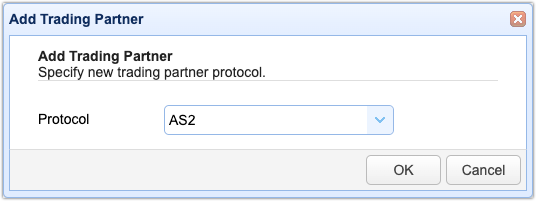
You’ll need to specify the protocol used to connect to this trading partner. Expand the drop-down list and then select AS2. Click OK to proceed.
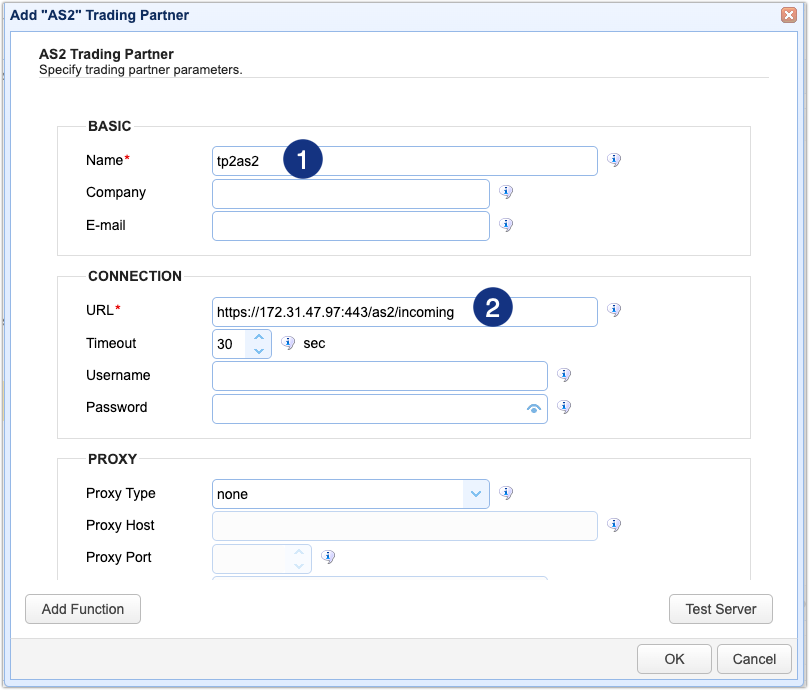
As soon as the AS2 trading partner dialog appears, fill out the following fields:
Note: In a production environment, it’s recommended to fill out all the other fields.
- The Name for this trading partner (e.g. “tp2as2”)
- The URL of the AS2 service you’ll be connecting to (e.g. “https://172.31.47.97:443/as2/incoming”). If you’re routing your AS2 connection through a firewall and are implementing a strict firewall policy wherein you need to add allowed IP addresses to a white list, make sure you add the IP address in question to that list.
Note: If your AS2 trading partner is just another JSCAPE MFT Server instance, you can simply log on to that instance and then copy the URL in question from Settings > MISCELLANEOUS > Web > AS2 tab > INBOUND > HTTPS URL.
- The AS2 From ID – This is a string of alphanumeric characters that serves as an identifier for the AS2 trading partner from which an AS2 message originates.
- The AS2 To ID – This is a string of alphanumeric characters that serves as an identifier for the AS2 trading partner to which an AS2 message is sent.
Note: Make sure the value of your To ID field for this trading partner object is equal to the AS2-From header for inbound AS2 messages coming from the associated physical trading partner. If you’re testing this using two JSCAPE MFT Server instances, just make sure the To ID in the AS2 trading partner of the first instance matches the From ID in the AS2 trading partner of the second instance and vice versa.
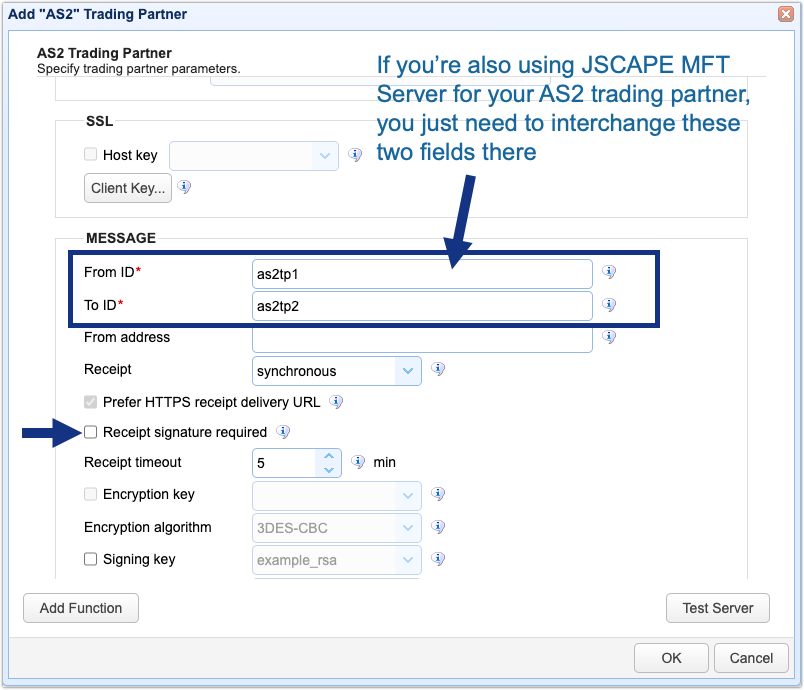
As we’re only setting up this AS2 environment for testing purposes, you’ll have to disable one particular setting. Kindly un-tick the Receipt signature required checkbox. This will disable the use of digital signatures in your AS2 Message Disposition Notification (MDN) receipts. MDNs serve as electronic receipts and are used to enforce non-repudiation.
JSCAPE MFT Server supports both synchronous MDN and asynchronous MDN, and will send MDN receipts when you run tests on this setup. However, it won’t be affixing digital signatures to them. Thus, if you enable that setting, you may get an error during transmission.
Again, in a production environment, you’ll need to specify other connection and trading partner details, and configure more settings than what we’ve covered here. What we’ve covered here is only the bare minimum you need to start exchanging AS2 messages within a test system.
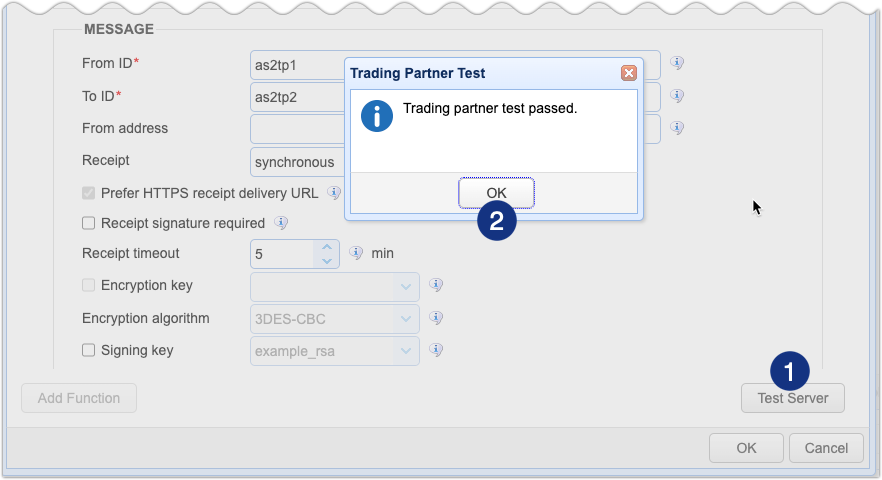
To see if your AS2 connection works, click the Test Server button. If you get a message box confirming that your test passed, click OK until you’re back at the Trading Partner screen. You should now be ready to send a test EDI document.
Send a test EDI document manually
In real-world scenarios, AS2 messages are normally exchanged automatically between AS2 endpoints. In fact, we’ve outlined the steps to enable that capability in the tutorial How To Set Up Automated AS2 File Transfers. In the meantime, since we’re only sending messages for testing purposes, it’s alright to do this manually.
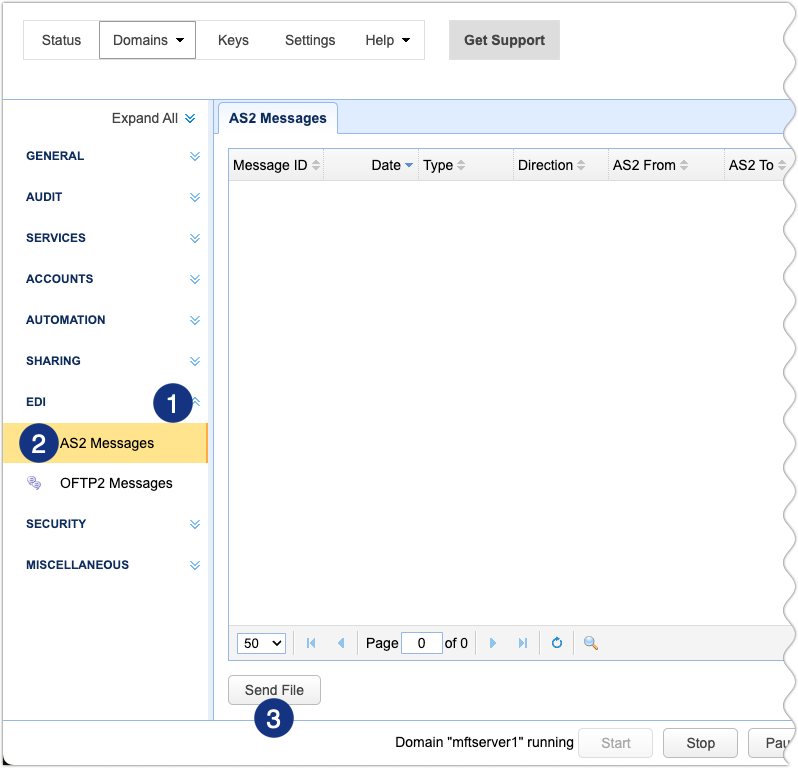
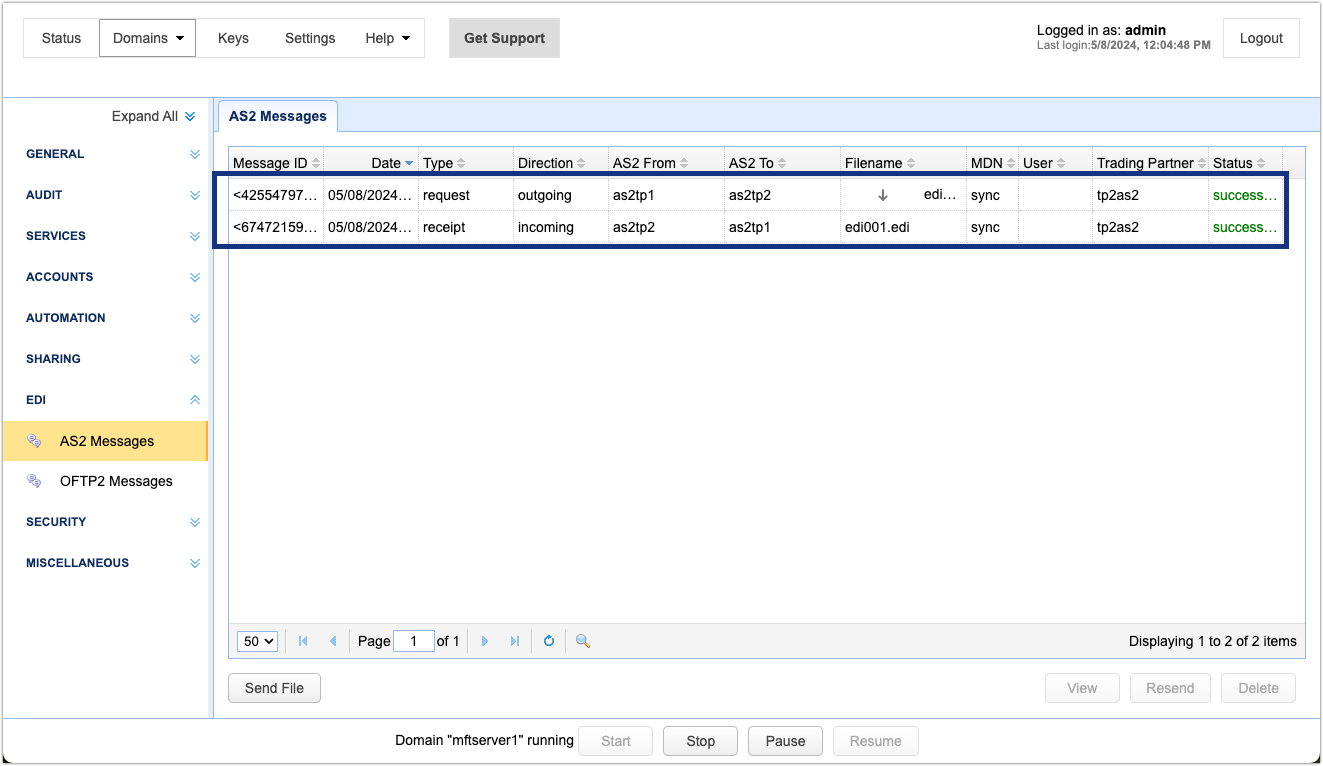
To send an AS2 message manually on JSCAPE MFT Server, expand the EDI menu, click AS2 messages and then click the Send File button.
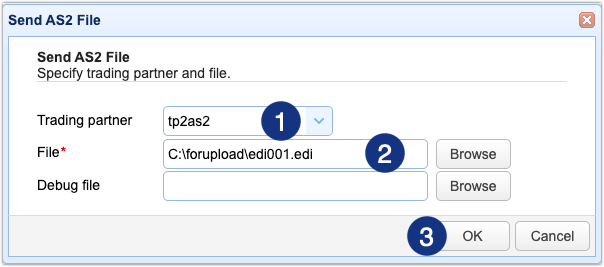
Next, select the receiving trading partner and then specify the path and filename of the file you wish to send. You may also simply click the Browse button and select the file in question from there. While AS2 data transfers normally use X12, EDIFACT, XML and CSV file formats, JSCAPE MFT Server supports any file type. Thus, you can use any file to test this out. Click OK to proceed.
If all goes well, you should see two log records indicating a successful AS2 transmission. The first record represents the outbound transmission, while the second record represents the inbound transmission. The inbound transmission is for the MDN receipt.
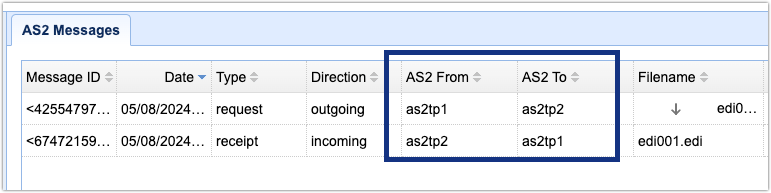
Notice how the To and From AS2 IDs are interchanged for the outgoing and incoming transmissions, clearly showing which trading partner is sending and receiving in a particular AS2 transmission.
Get a demo
In case you’ve only been reading along but haven’t actually tried the steps yourself because you feel intimidated, perhaps you’d like to book a demo instead. We’ll be happy to explain the steps in more detail and guide you every step of the way.

