

For those who landed on this page via the search engines, this post is a continuation of our article re Setting up a Linux FTP Server. I suggest you read Part 1 first if you haven't done that yet.
If you've already read Part 1 and have removed existing FTP services as well as installed Java on your server, you're ready to proceed to the next part, which is to install and configure JSCAPE MFT Server.
Need to jump to back to part 1 or proceed to part 3? Click the links below.
- Part 1 - Setting Up a Linux FTP Server
- Part 2 - Setting up a Linux FTP Server (current article)
- Part 3 - Setting up a Linux FTP Server
If you want to watch a video version of Part 1 and Part 2, play the video below. Otherwise, feel free to skip it.
Downloading, installing and configuring JSCAPE MFT Server
To start, go to the JSCAPE MFT Server download page. Fill out the form provided. You'll then be shown installers for different platforms. You may download either the RPM installer or the ZIP installer and save that file in a folder in your Linux machine.
If you downloaded the rpm package, you may simply run:
rpm -iv install.rpm
That should automatically unpack JSCAPE MFT Server into the /opt directory.
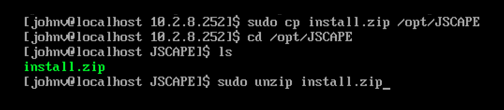
On the other hand, if you downloaded the .zip file, copy the file into the /opt directory and unzip the file there. I normally create a 'JSCAPE' folder first and then unzip the file inside by executing the unzip command:
unzip install.zip
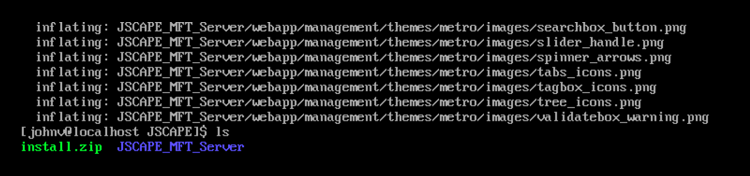
If all goes well, a folder named JSCAPE_MFT_Server should be created inside /opt/JSCAPE/ (or whichever directory you unzipped the file from).
Navigate into that JSCAPE_MFT_Server folder and then enter the these commands in the following order:
./js-database-configuration -configure
./js-database-configuration -init
The next command adds a server administrator user account and takes the form:
./js-addadmin -db -username [username] -password [password] -sa
Where [username] will stand for your admin username and [password] for its corresponding password.
For example, I entered:
./js-addadmin -db -username admin -password secret -sa
The next command configures the administration service and takes the form:
./js-server-configuration -host [ip address] -port [port] -timeout [timeout in seconds]
Where [ip address] and [port] are the IP/port that you want the JSCAPE MFT Server Service to listen on, and [timeout in seconds] is the timeout value for this service. The default port for the JSCAPE MFT Server Administration Service is 10880.
For example, I entered:
./js-server-configuration -host 0.0.0.0 -port 10880 -timeout 60
Note, the IP address 0.0.0.0 is a special address that instructs the service to listen on all available network interfaces.
The next command configures the Web/REST settings and takes the form:
./js-web-configuration -host [REST ip address] -port [REST port] -timeout [timeout in minutes]
The default port for the JSCAPE MFT Server Web/REST service is 11880. For example, I entered:
./js-web-configuration -host 0.0.0.0 -port 11880 -timeout 10
The succeeding command configures the credentials used when invoking command line utilities and takes the form:
./js-client-configuration -host [host] -port [port] -timeout [timeout in seconds] -user [username] -password [password]
Make sure the user and password parameters match the username and password that were used earlier in the js-addadmin command. For example, I entered:
./js-client-configuration -host 0.0.0.0 -port 10880 -timeout 60 -user admin -password secret
After that, you can then proceed to start the MFT Server service using the command:
./start_service.sh
Here's a screenshot of all those commands in an actual installation:
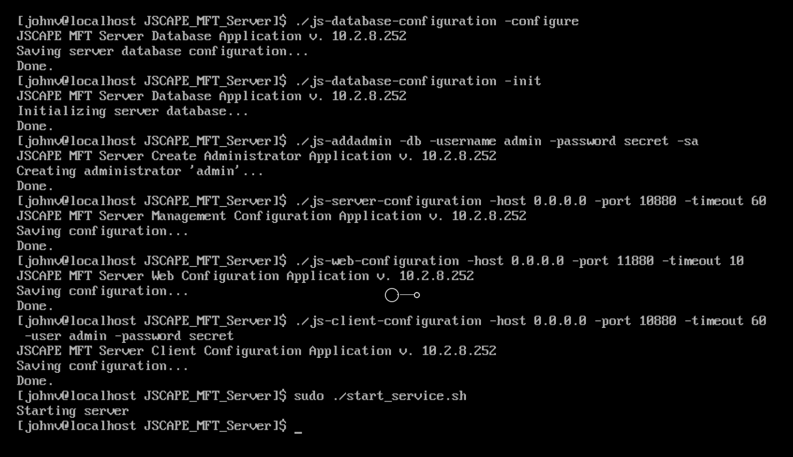
In the screenshot above, you'll notice that I already executed the start_service.sh command, which is responsible for starting the JSCAPE MFT Server service.
Once you have your JSCAPE MFT Server running, you will normally want to administer it through its administrative web interface. Because it's web-based, you can run it through any web browser, e.g. Chrome, Firefox, Safari, IE, Edge, etc., and manage your server remotely. Unlike in previous versions of MFT Server, there's nothing to install.
Just fire up your favorite web browser and point it to https://[hostname]:[port] where [hostname] is the IP address or hostname of MFT Server and [port] is the listening port of the REST management web service defined during the installation process. The default port is 11880.
If you see the login dialog as shown below, pat yourself on the back.
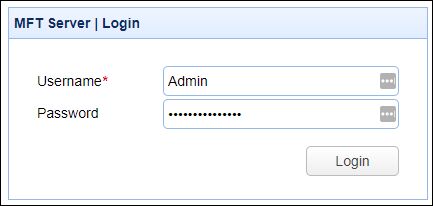
You've successfully installed JSCAPE MFT Server and are now ready to add an FTP service. Check back for that in Part 3!
Get Started
Want to try this yourself? Download a free, fully-functional Starter Edition of JSCAPE MFT Server now.
Download JSCAPE MFT Server Trial