
Scheduled file transfers offer significant operational, strategic and technical benefits. They allow your IT staff to save time and improve productivity. They also help ensure that data transfers for time-sensitive business processes are consistently carried out on time. Lastly, they enable you to maximize computing resources and network bandwidth when you schedule the transfers to run after office hours.
In this tutorial, you’ll learn how to automate file transfers on Windows using two methods. The first method only works with the File Transfer Protocol (FTP). The second method, however, can be applied to all major file transfer protocols, including FTP, Secure File Transfer Protocol or SSH File Transfer Protocol (SFTP), File Transfer Protocol Secure (FTPS), Applicability Statement 2 (AS2) and many others.
Not only that, the second method works seamlessly not only on Windows, but also on all other major operating systems such as Linux, Mac and UNIX.
Note: FTPS is different from SFTP. FTPS is the secure version of plain FTP. It gets its security features from Secure Sockets Layer/Transport Layer Security (SSL/TLS). On the other hand, SFTP gets its security features from Secure Shell (SSH).
How to set up a scheduled file transfer on Windows
While there are many ways to create a scheduled file transfer on Microsoft Windows, the most popular method involves using a script file containing FTP commands, a batch file that loads that script file and the Windows Task Scheduler.
Create a script file containing FTP commands
Here’s how the contents of a simplified Windows FTP script file may look like, numbered to match the brief explanations below:
- open ftp.example.com
- username
- password
- cd /remote/directory
- lcd C:\local\directory
- put test.txt
- bye
Let me quickly explain what each of these seven lines do.
- Connects to a remote FTP server. The entry “ftp.example.com” is the server’s hostname, but you can replace that with the server’s IP address.
- Submits a valid username.
- Submits the password that corresponds to that username.
- Specifies the remote directory where you want the uploaded file to be stored.
- Specifies the local folder that contains the file you want to upload.
- Uploads the file to the FTP server.
- Exits the FTP client.
Note: If you’re trying this out and the “lcd” command doesn’t work, just omit it and then rewrite the “put” line to “put C:\local\directory\test.txt”.
This FTP file, just like other script files, is just a text file with commands. So, you can create this file using an ordinary text editor like Windows Notepad. Let’s say we saved this file under the filename “ftp_script.txt”.
Create a batch file that loads the FTP script file
Windows systems normally have a built-in command line FTP client. You can use that FTP client to run the script file above like so:
ftp -s:ftp_script.txt
Or, if file is in the c:\ftpscripts\ directory and you’re in a different working directory,
ftp -s:c:\ftpscripts\ftp_script.txt
That single command should sequentially execute each line in the script file. However, because we want this process to be fully automated, we don’t want to execute this ftp command straight from the command line. Instead, we want to enter this command into a batch file and then run the batch file from the Windows Task Scheduler. That batch file may contain something like this:
@echo off
ftp -s:ftp_script.txt
Again, these scripts are oversimplified. Real-world scripts are much longer and sophisticated.
Let’s say we saved this batch file under the filename “ftpscriptrunner.bat”.
Run the batch file as a scheduled task in the Windows Task Scheduler

Once the batch file is ready, you can then run that file as a scheduled task. Here are the steps to do that:
- Launch the Task Scheduler.
- Under the Actions panel, click Create Basic Task.
- Specify the task’s name, e.g., “FTP upload task”.
- Select a trigger, i.e., when you want the task to run. The options include Daily, Weekly, Monthly, One time, When the computer starts, When I log on and When a specific event is logged.
- Specify the trigger parameters. For example, if you choose “Daily”, you need to specify the time.
- In the Actions dialog, choose Start a program.
- Browse and select the batch file. In our case, that file would be “ftpscriptrunner.bat”.
Once you’re done, the Task Scheduler will execute the batch file on your pre-defined schedule. In turn, the batch file will run the FTP script file, and the FTP file upload will commence.
How to schedule file transfers the easy way
That first method relies heavily on scripts and is only applicable to FTP tasks. If you need to use another file transfer protocol, you’ll have to make some changes, especially in the script code. Of course, you’ll have to be familiar with the syntax and commands of the protocol in question in order to write functional scripts for that protocol. You’ll encounter this type of problem if your organization exchanges files with multiple trading partners that use different protocols.
That’s not the only problem though. If you want to implement the same functionality on a different operating system, you also need to be familiar with the syntax and commands for the scripting languages and scheduling tools used in that platform. For instance, if your FTP application is running on Windows, you need to be familiar with batch scripts and the Windows Task Scheduler. But if it’s running on, say, Linux, you need to be familiar with bash and the cron service.
Indeed, it’s going to be extremely difficult to develop and maintain file transfer schedulers using script-based methods. The method you’re about to see is much easier.
This method of scheduling file transfers can be easily implemented on JSCAPE by Redwood, a managed file transfer solution that offers a low-code/no-code automation tool. With JSCAPE MFT, you can build automated file transfer workflows with very minimal code or no code at all.
Moreover, JSCAPE MFT Server, the on-premises version of JSCAPE MFT, can be installed in all major operating systems. Thus, the steps I’m going to show you here work regardless if you’re using a Windows, Linux, Mac or UNIX system.
Let me now show you how easy it is to create an FTP scheduler using JSCAPE MFT. If you wish to follow along, you may request a free trial. If you have no time for that yet, you can also just scan through the steps below and see if it’s worth testing.
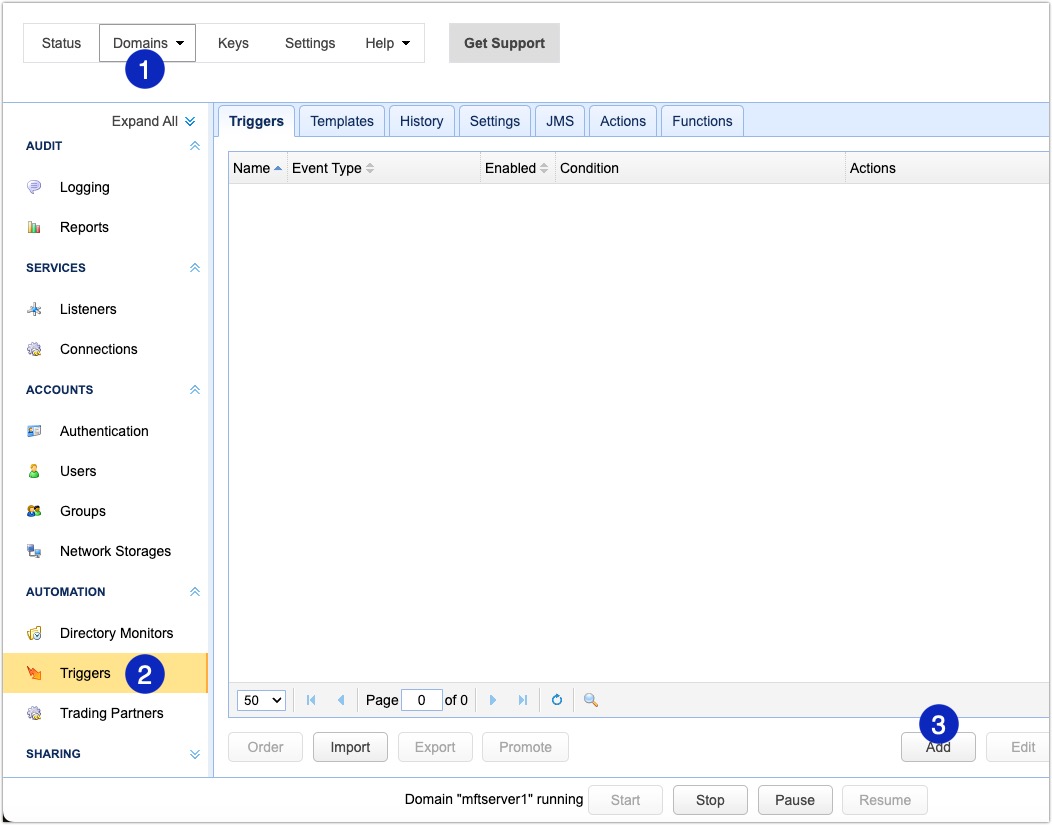
Let’s assume you already have an instance of JSCAPE MFT up and running. You can start by navigating to a domain, clicking on the Triggers menu on the sidebar and then clicking on the Add button.
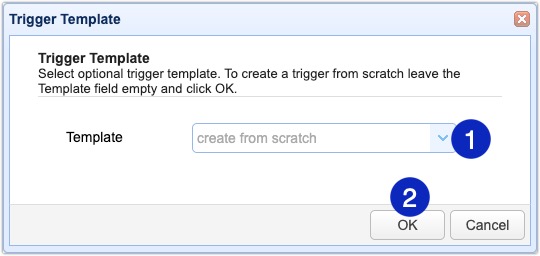
That should launch the Trigger Template dialog. If you want, you can expand the Template drop-down list and choose a suitable template to jump-start the trigger creation process. In this example, we’ll just be creating a trigger from scratch, so we can simply click on the OK button to proceed.
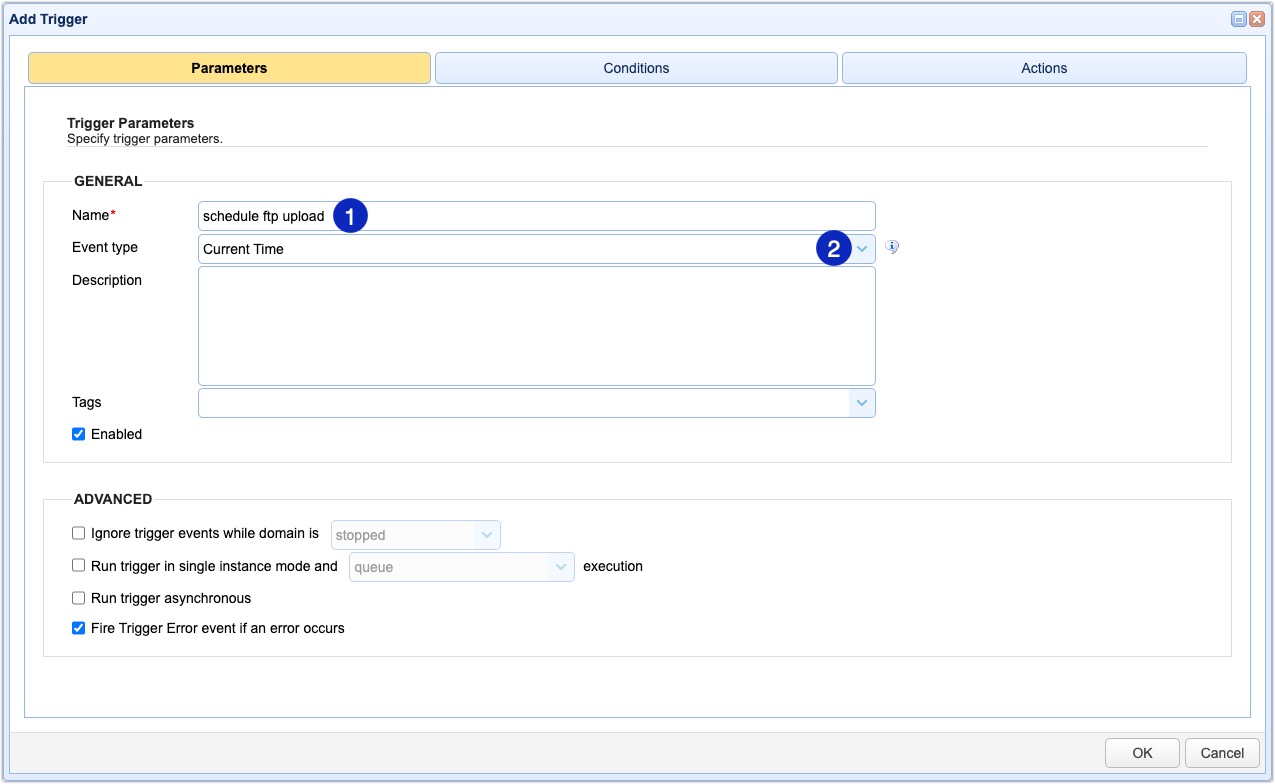
In the context of a JSCAPE MFT environment, a trigger consists of three main parts, which you can navigate to by clicking their respective tabs at the top of the screen:
- Trigger parameters: This is where you specify the name of the trigger, the event that would set off this particular trigger and a few other general parameters.
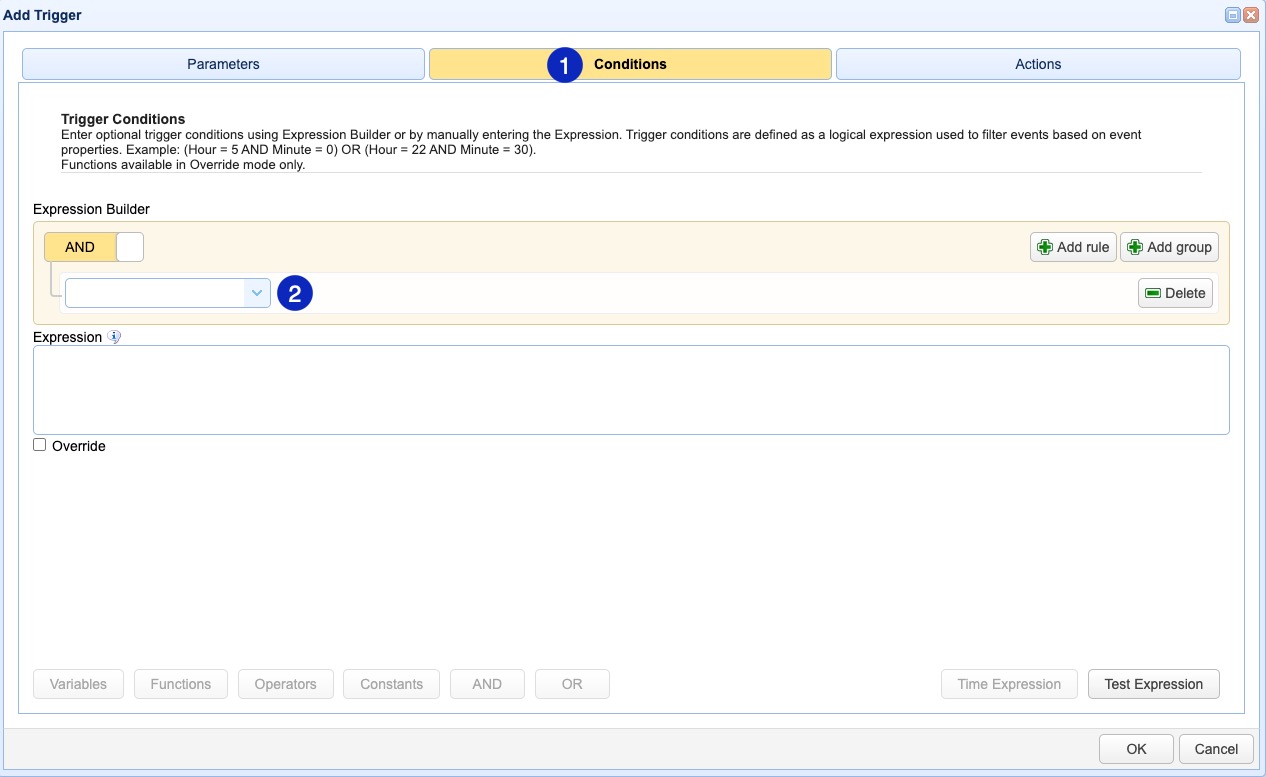
- Trigger conditions: These are the optional logical expressions used to filter events based on relevant event properties.
- Trigger actions: These are the action(s) that this particular trigger would ultimately execute.
Let’s just call this sample trigger “schedule ftp upload”. And, since this is going to be time-induced trigger, let’s select the Current Time event type. We can leave the rest of the parameters as is.
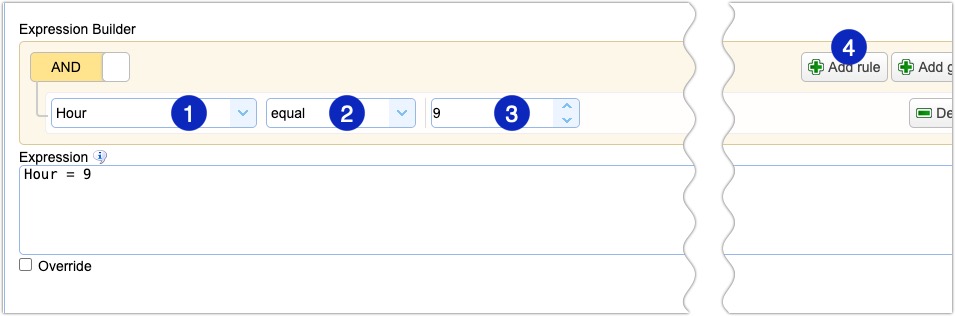
To set the trigger conditions, click the Conditions tab. You can create trigger conditions using either the graphical Expression Builder or by manually entering the expressions yourself in the Expression box.
We’ll be using the Expression Builder for this example, so we’ll just click the first drop-down list to start building.
You can build expressions by selecting appropriate event properties, operators, values and so on. In our case, we want this FTP scheduler to execute every 9:58 AM on the 17th day of each month.
Refer to the succeeding screenshots to see how you can build the appropriate expression. Notice that the corresponding expression is automatically entered into the Expression box as you build it using the Expression Builder.

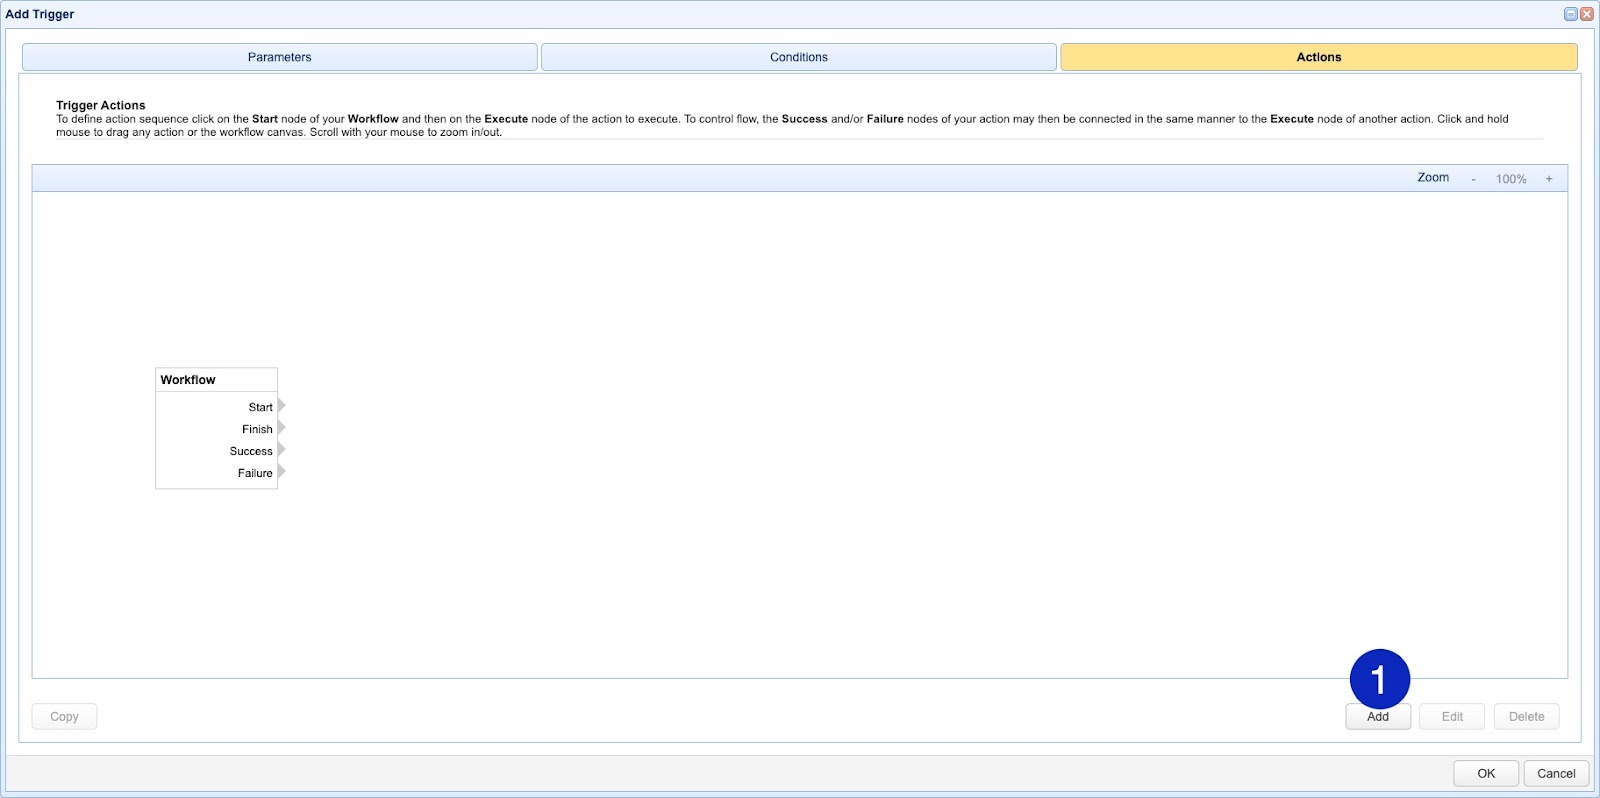
Once you’re done building the expression, click the Actions tab to start adding appropriate trigger actions.

What you see below is the workflow canvas. Each time you add a trigger action, that action will be added to the canvas. To add a trigger action, just click the Add button.
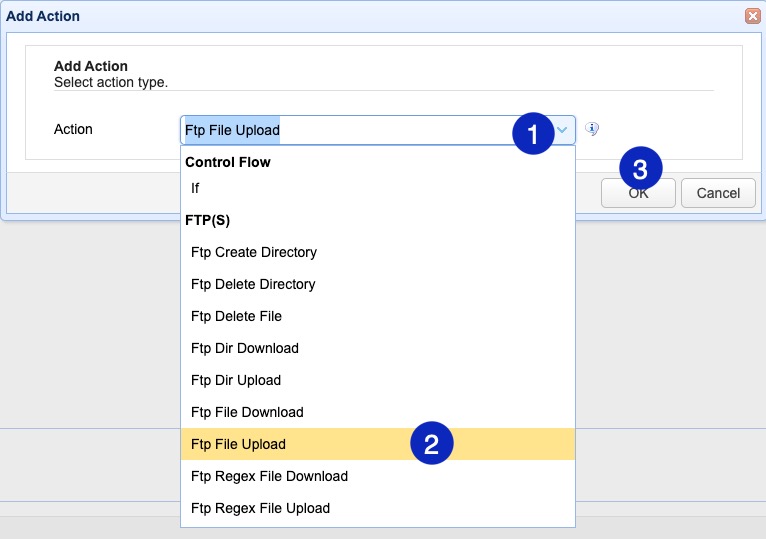
That should bring up the Add Action dialog box. Expand the Action drop-down list and select an appropriate trigger action. You should then see an extensive list of possible trigger actions. Notice that, while we’ll be using a trigger action for FTP transfers, you can actually find several other similar trigger actions for uploading files to other types of file transfer services.
This is what I meant when I said you can use this same method for other file transfer protocols. If you want to schedule a file transfer using a different file transfer protocol, all you need to change on this trigger is the trigger action.
Since we want this scheduler to upload a file to an FTP server, we can simply select the “FTP File Upload” trigger action and then click OK.
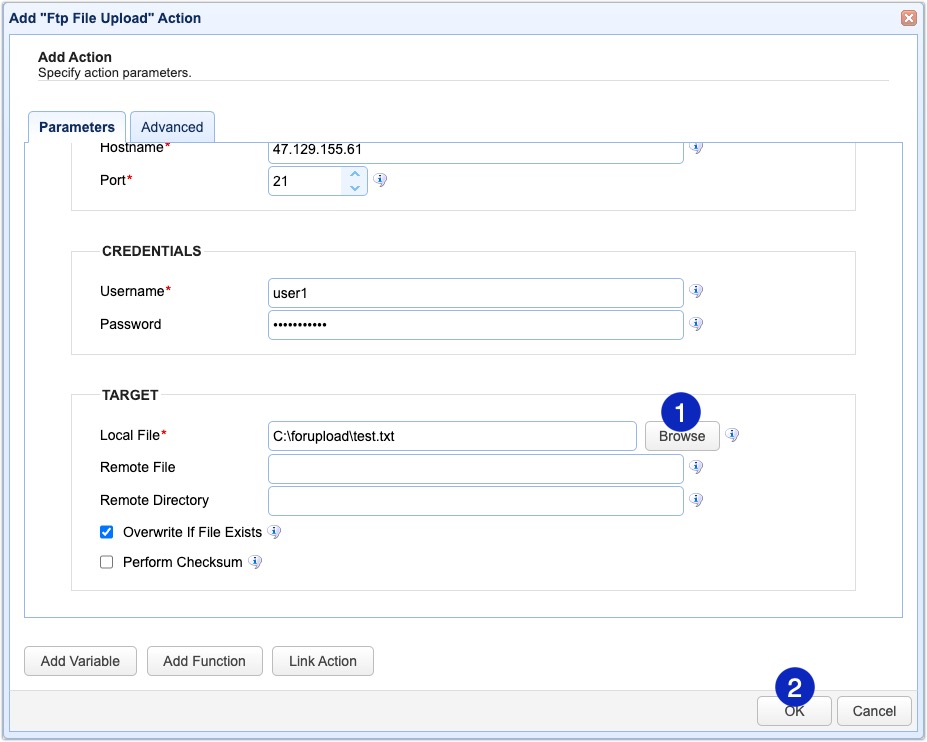
We can then enter relevant parameters, such as the hostname or IP address of the remote server and valid login credentials, i.e., a valid username and password.
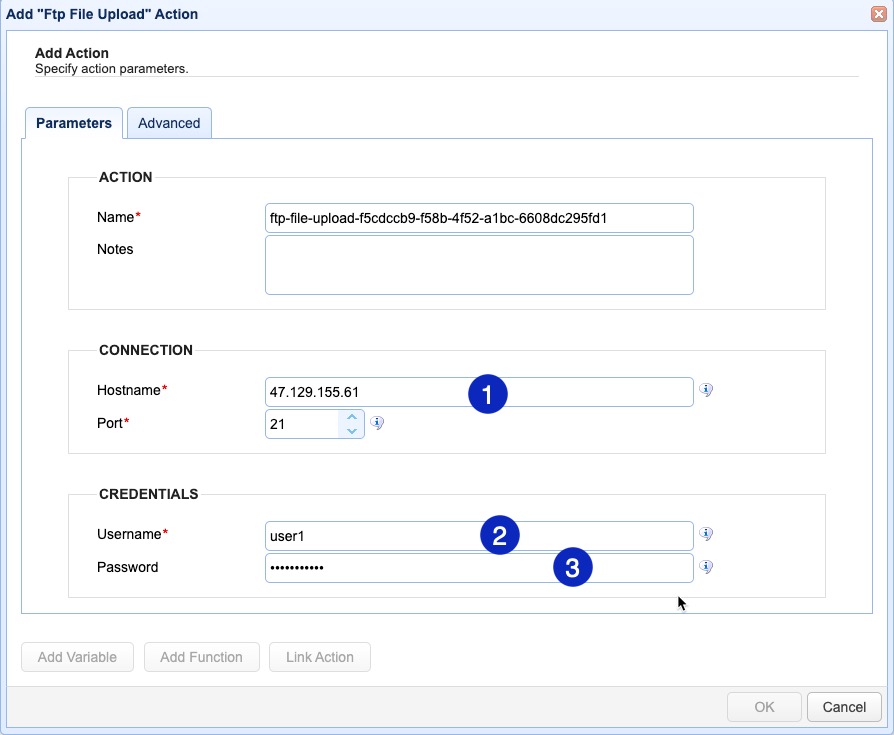
If you scroll down, you can specify the file to upload. To do that, just click the Browse button and navigate to the right folder. You can then select from the list of files in that folder. Once you’re done, click OK.
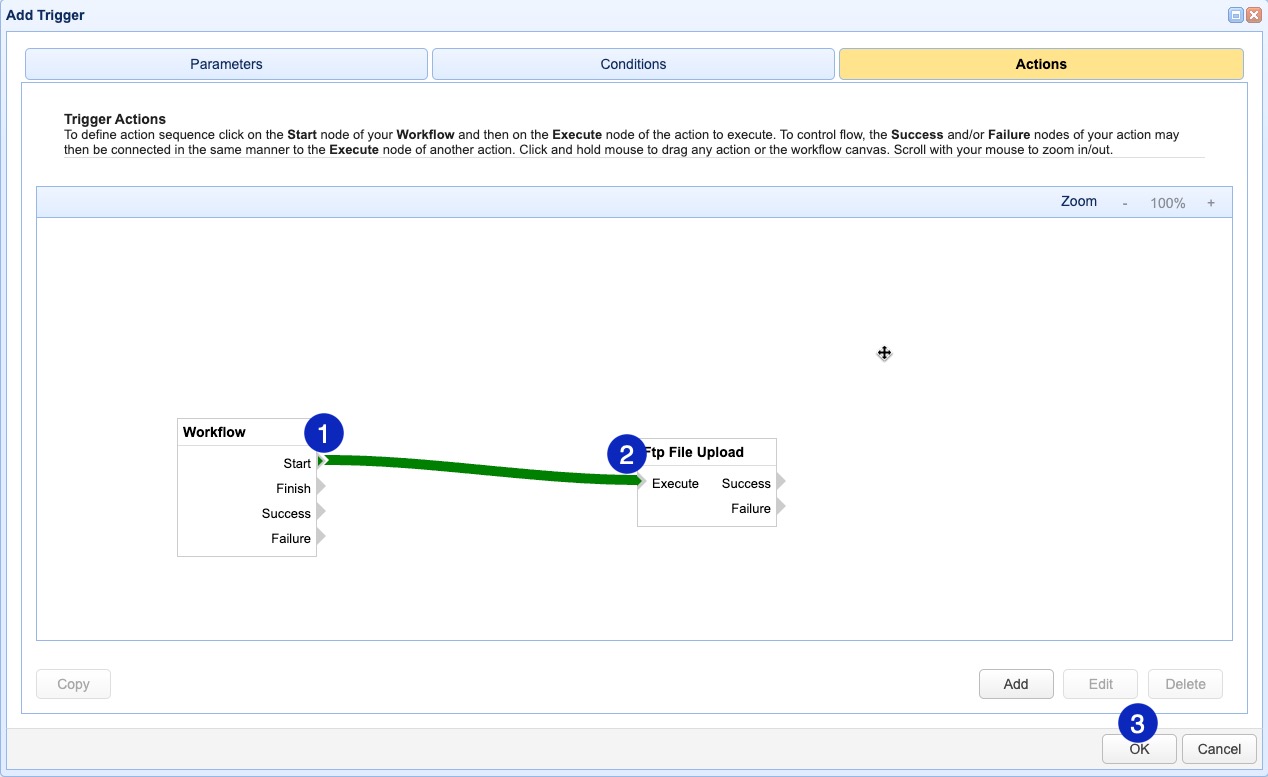
You should then see your newly added trigger action on the workflow canvas. The only thing left to do is to connect the Start node of the Workflow object to the Execute node of the newly added trigger action. This can be done by simply clicking on the Start node and then on the Execute node. Since this is the only trigger action we’ll be adding in this example, we can click the OK button to proceed.
That’s all you really need to do to create an FTP scheduler using JSCAPE MFT. In case you need to see more examples that feature other file transfer workflows, I’ve added a short list of examples below.
- How to schedule automatic downloads with trading partners
- Set up automated synchronization between a Linux directory and an Amazon S3 bucket
- Auto-generate a list of files that have just been downloaded
- Get an automated email notification showing a list of recent downloads
Some of the examples may still be using older versions of JSCAPE MFT, so the graphical user interface (GUI) may look slightly different. Regardless, they all still show how easy it is to build automated workflows using JSCAPE MFT. JSCAPE MFT comes in two forms:
JSCAPE MFT Server, an installable on-premises server application
and
JSCAPE SaaS, a cloud-based version of JSCAPE MFT Server, is delivered under a software-as-a-service (SaaS) model.
If you’d like to see any of these solutions in action, schedule a quick demo now.

