
Many businesses use Secure File Transfer Protocol (SFTP) to transfer data between business units or to trading partners. With the growing adoption of cloud solutions, it makes sense to leverage the cloud to enhance deep-rooted solutions like SFTP. For instance, you can integrate your SFTP server with Amazon Simple Storage Service (S3) so that files SFTP users and trading partners upload to that server are automatically forwarded to an AWS S3 bucket.
With this set up, you can take advantage of the scalability, reliability and flexibility of the cloud as a storage system for your SFTP service. That’s not all. Your data’s close proximity to other Amazon Web Services (AWS) solutions, opens up a whole new set of possibilities. For instance, it can help you leverage solutions like AWS Lambda, Amazon Elastic MapReduce (EMR) and Amazon Athena to perform advanced analytics.
Let’s take a look at a couple of sample use cases utilizing the SFTP to S3 bucket set up we just described.
Sample use cases for uploading files to an AWS S3 bucket via an SFTP server
Data ingestion from legacy systems
A financial institution collects transaction data from various branches. These branches mostly use legacy systems, so they may send their data to a central location via SFTP. The SFTP server in turn automatically forwards the data to an AWS S3 bucket. Once the data is on S3, it’s then processed by other AWS services for data analytics.
Healthcare data backup
A healthcare organization manages patient records, medical images and diagnostic reports. All this medical data must be backed up securely to comply with regulatory and corporate data security policy mandates. Medical data generated by hospitals, clinics and diagnostic centers is securely transmitted to a central server via SFTP. That central server then automatically backs up the received data to specific folders within an AWS S3 bucket.
Do you think your organization can use SFTP-to-S3 file transfer capabilities? The following tutorial can help you achieve that.
Prerequisites
First, let’s outline the basic requirements for setting up an SFTP to S3 file transfer. There are only two basic requirements: an Amazon S3 bucket folder and an SFTP service.
An Amazon S3 bucket
The first thing you’ll need is an S3 bucket and a folder inside it. While you can theoretically transfer files to your S3 bucket home directory, it’s not the usual practice. In real-world scenarios, you would normally transfer files to S3 bucket folders instead of the S3 bucket itself. Of course, to create an S3 bucket, you would need an AWS account.

An SFTP service running on JSCAPE MFT Server
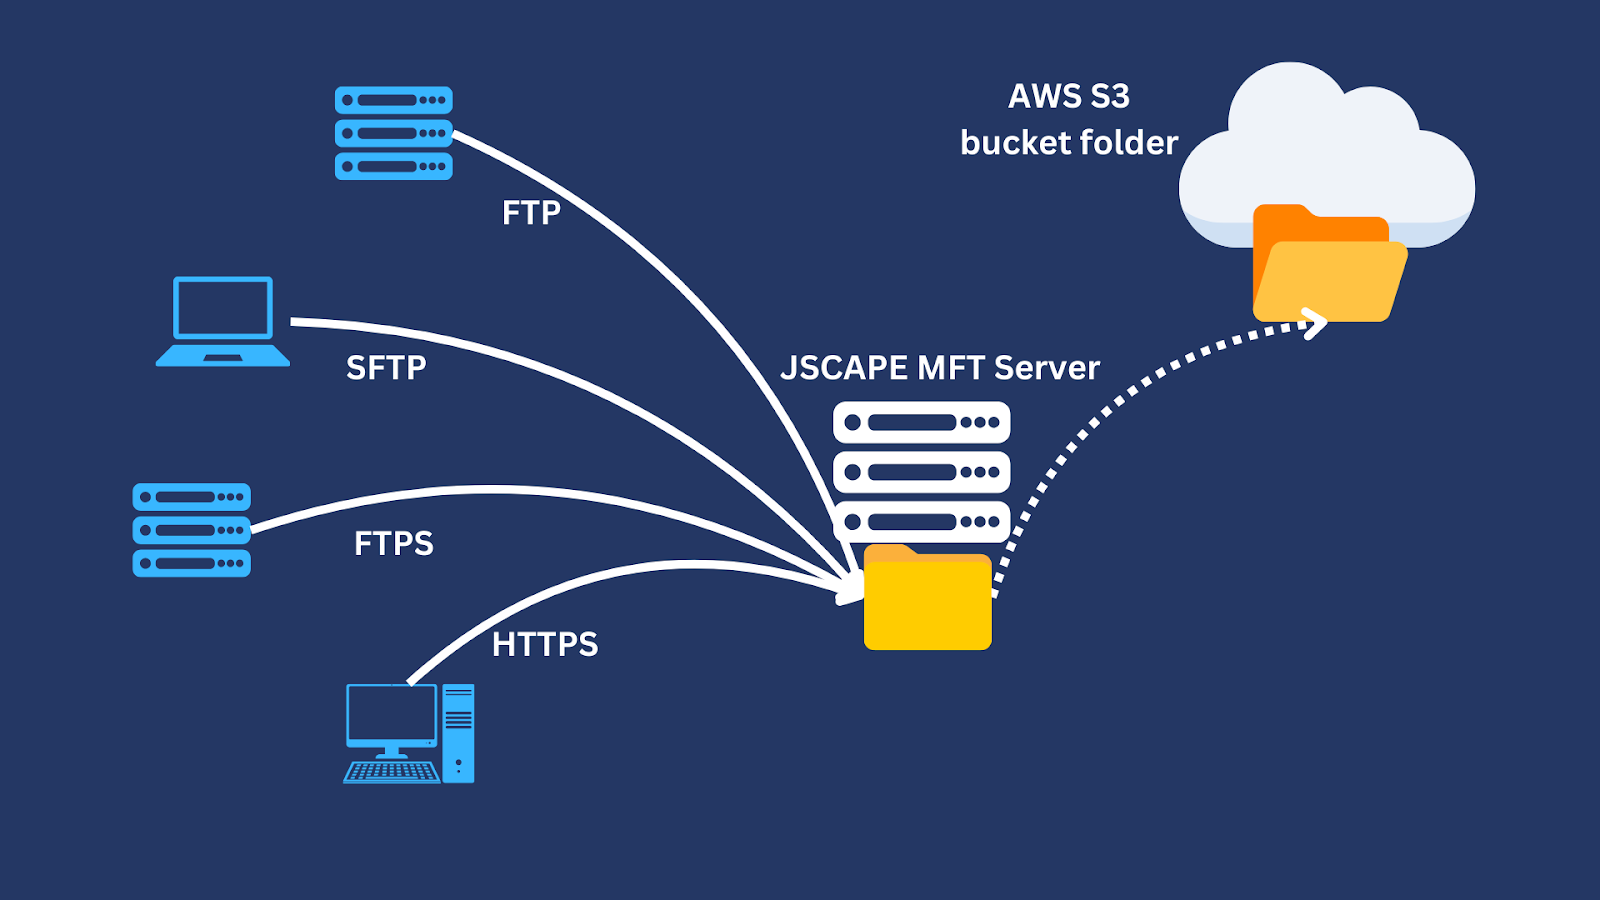
For this tutorial, we’ll be using JSCAPE MFT Server by Redwood as our SFTP server. JSCAPE MFT Server is no ordinary SFTP server. It’s a managed file transfer (MFT) server. Meaning, it supports a wide range of file transfer protocols, including:
- SFTP, which is also known as SSH File Transfer Protocol
- File Transfer Protocol (FTP)
- FTPS (FTP over SSL)
- Applicability Statement 2 (AS2)
- Hypertext Transfer Protocol (HTTP)
- HTTP Secure (HTTPS)
- Odette File Transfer Protocol (OFTP)
- And many others
JSCAPE MFT Server’s multi-protocol capability enables you to set up not only SFTP-to-S3 file transfers, but also other x-protocol-to-S3 combinations such as FTPS-to-S3, HTTPS-to-S3 and so on.
Not only that, JSCAPE MFT Server is also equipped with an array of security features, including multi-factor authentication, data-at-rest encryption, data loss prevention (DLP), malware protection and high availability, among others. These features ensure your data and file transfers are protected at all times.
In addition, JSCAPE MFT Server also comes with a low- code/no-code automation feature that enables you to easily automate your file transfer workflows and business processes with just a few clicks. This automation feature is enhanced by JSCAPE MFT Server’s REST API, plus a wide selection of connectors.
These connectors enable you to easily integrate your MFT server with other applications, data sources and services such as Server Message Block (SMB) shares, other file transfer servers and even other cloud services like Microsoft Azure Data Lake, Google Cloud Storage, DropBox, Box and many others. In effect, you’ll be able automate not only file transfer workflows, but also entire business processes.
JSCAPE MFT Server supports multiple deployment options. You can install it on Windows, Linux, UNIX and macOS machines. It even has an MFT-as-a-Service (MFTaaS) option that eliminates the hassles of deploying, managing and maintaining the underlying MFT solution.
We already discussed how to set up an SFTP server using JSCAPE MFT Server in another tutorial. You may click that link if you want to follow the steps outlined there.
Tutorial: How to transfer files from SFTP server to AWS S3 bucket
Once you have your SFTP service on JSCAPE MFT Server and your S3 storage ready, you may follow the steps below. First, you need to create an S3 network storage object on JSCAPE MFT Server.
Create a network storage object
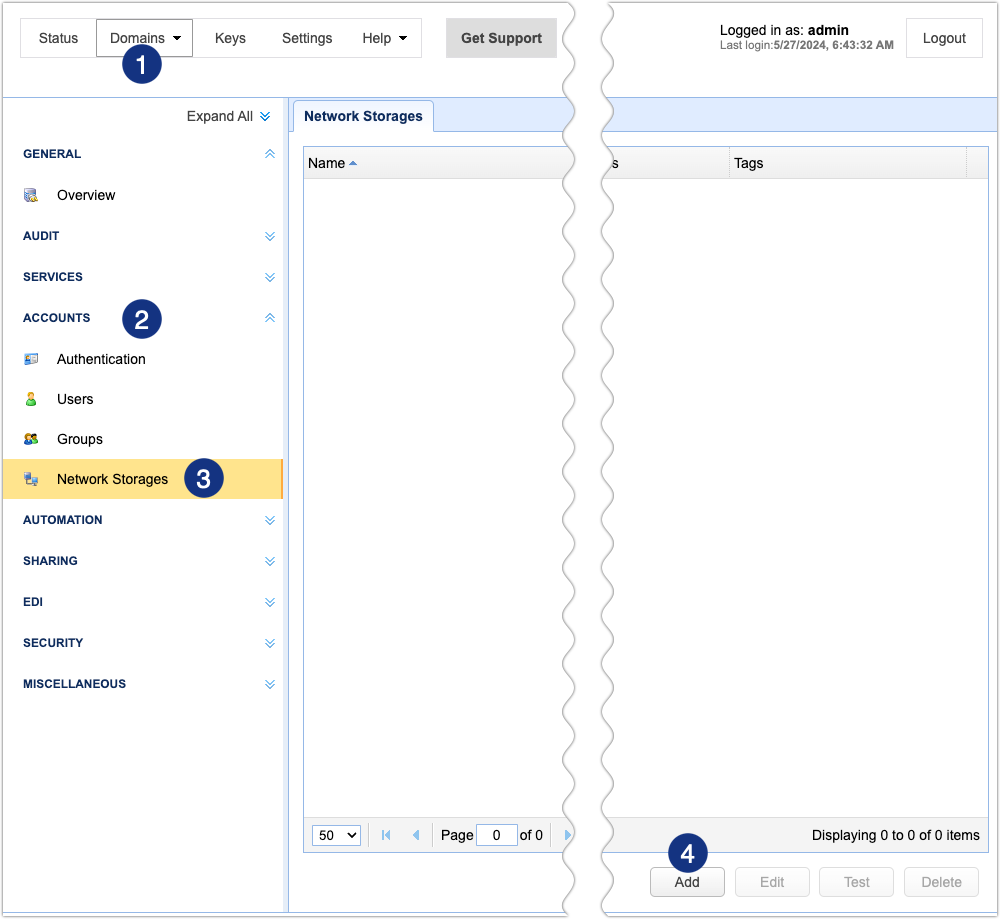
To create an S3 network storage on JSCAPE MFT Server, go to the Domains menu and select the domain where your SFTP service is running. On the left side panel, expand the Accounts menu and then click Network Storages. After that, click the Add button.
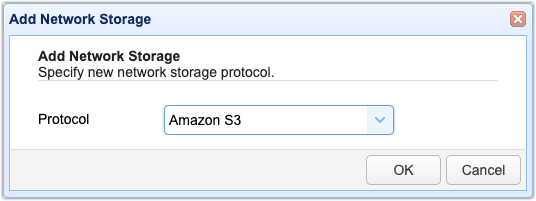
When the Add Network Storage dialog box appears, expand the Protocol drop-down list and then select Amazon S3. After that, click the OK button.
You’ll then be asked to enter pertinent Amazon S3 network storage parameters such as:
- The network storage Name – This will be used to identify this network storage in your JSCAPE MFT Server environment.
- Authentication options – You’re given three options:
- Use credentials – If you select this option, you’ll need to enter a valid Identity and Access Management (IAM) user Access key and Secret key combination. This is the option we’re using in this example.
- Replay credentials – If you select this option, JSCAPE MFT Server will use the current user’s login credentials to authenticate to Amazon S3.
- Use IAM Role – If you select this option, JSCAPE MFT Server will use the Identity and Access Management role to authenticate. Unlike an IAM user, which is associated with a single person or service, an IAM role can be assumed by any entity (e.g., a user, a service, or an application) that needs the permissions specified by the role.
- Region – This is the region associated with your AWS S3 bucket. Make sure to check your S3 bucket to get the right region. If you select the wrong region, you’ll get an error.
You may disregard the other parameters for now. If you wish to learn how to configure JSCAPE MFT Server for AWS S3 encryption, which is one of the configuration options shown on that parameters page, read these posts:
- Using AES-256 To Encrypt Files You Upload To Your S3 Trading Partner
- Using AWS KMS To Encrypt Files You Upload To Your S3 Trading Partner

Further down that parameters page, you’ll be asked to specify the Remote directory. In the case of an AWS S3 network storage, the remote directory refers to the path of the S3 bucket folder you wish to transfer files to. In this example, the bucket name is “sftps3bucket01” and the folder inside that bucket is named ‘folder1’. So, the path to that folder is: “sftps3bucket01/folder1”.

Before you save your settings, you’ll want to test the connection to see if it works. To do that, click the Test Server button at the bottom-right corner of that parameters page. If the test succeeds, click the OK button below the Test Server button to save your settings.

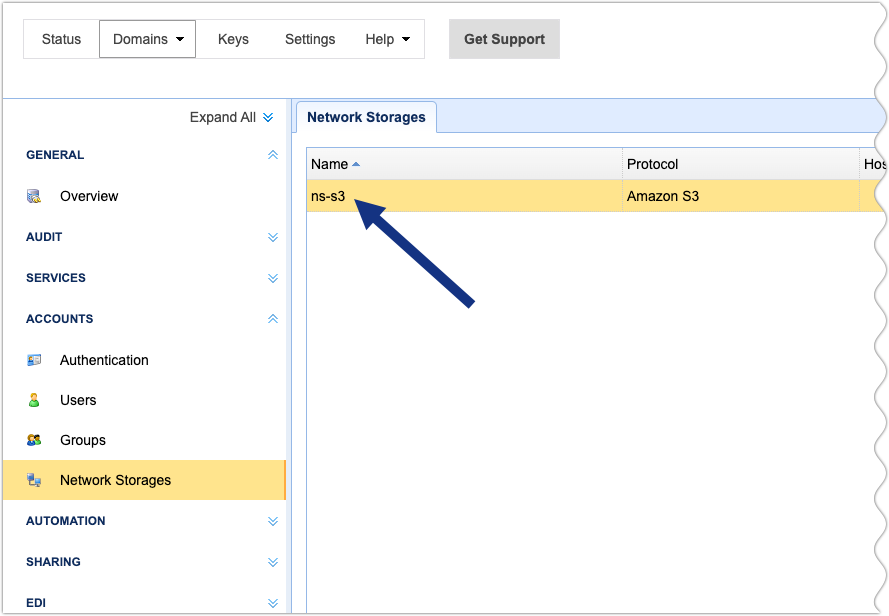
You should then see your newly created S3 network storage in the Network Storages tab.
Map the network storage to a virtual path
Next, you need to map that network storage to a virtual path. You have two ways to go about this:
- Map the network storage to a user’s virtual path, or
- Map the network storage to a group’s virtual path
If you map to a user’s virtual path, only that particular user will be able to upload files and download files to/from S3 via your SFTP service. If you map to a group’s virtual path, all users associated with that group can upload/download files to/from S3 via your SFTP service.
For this example, let’s just use the first option.
Go back to the Accounts menu and click the Users menu. Select the user account whose virtual path you want to map to the S3 network storage and then click Edit.
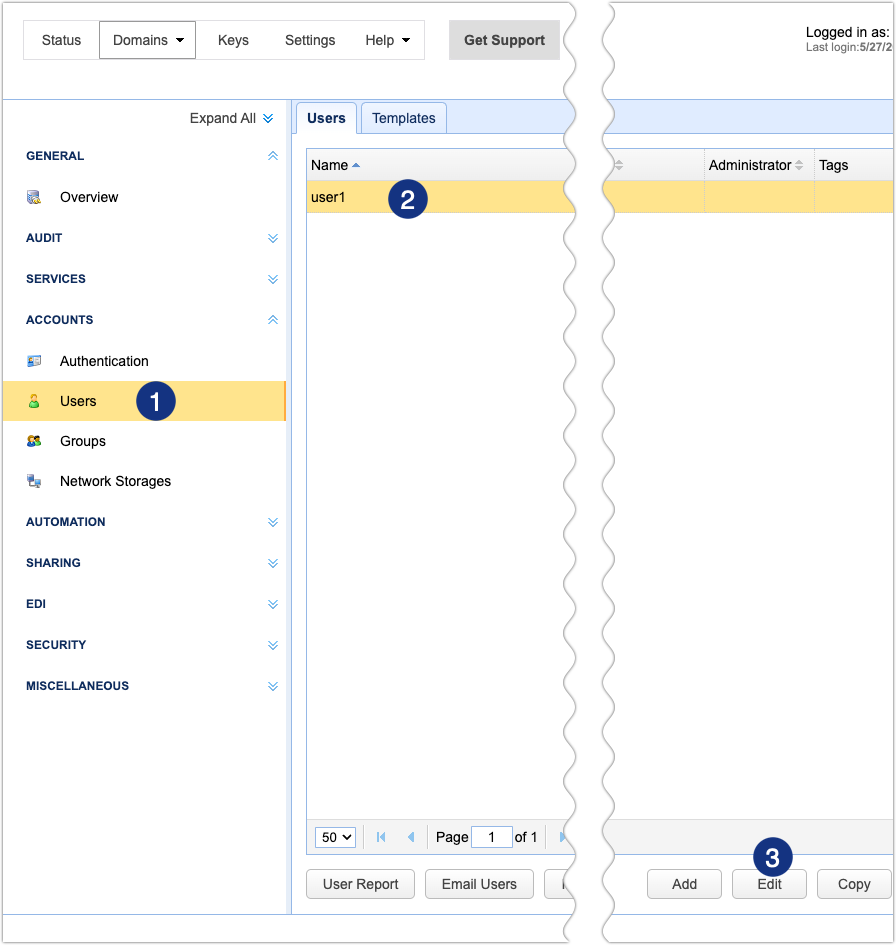
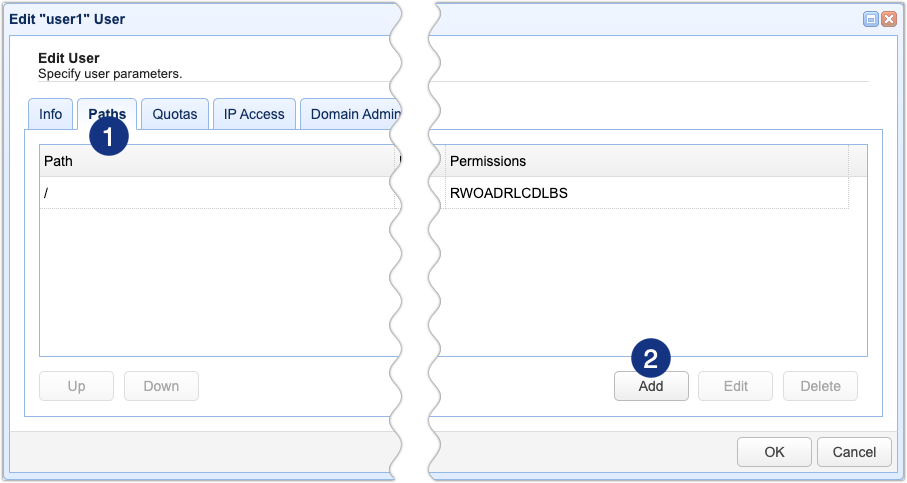
Navigate to the Paths tab and then click the Add button to add a new virtual path.
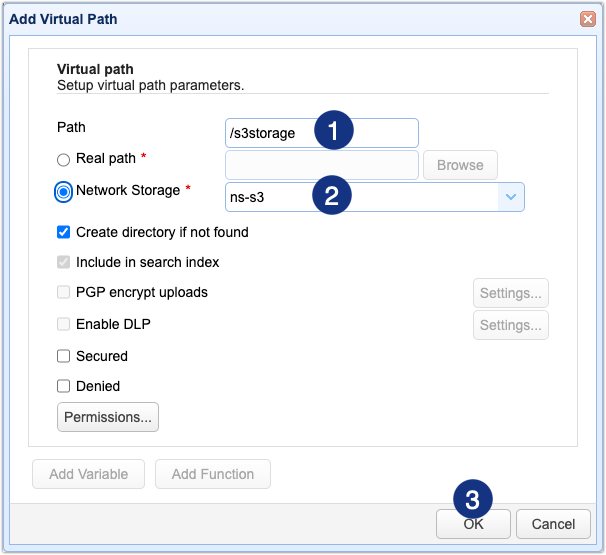
Once the virtual path parameters dialog box appears, input all pertinent information. At the minimum, you’ll need to specify a path name (e.g., /s3storage) and select your S3 network storage from the Network Storage drop-down list. In this example, that would be “ns-s3”.
You should see several other configuration settings. For instance, you may configure Pretty Good Privacy (PGP) encryption, enable DLP and set access permissions, among other functions.
Let’s skip those configuration settings for now. Click OK to proceed.
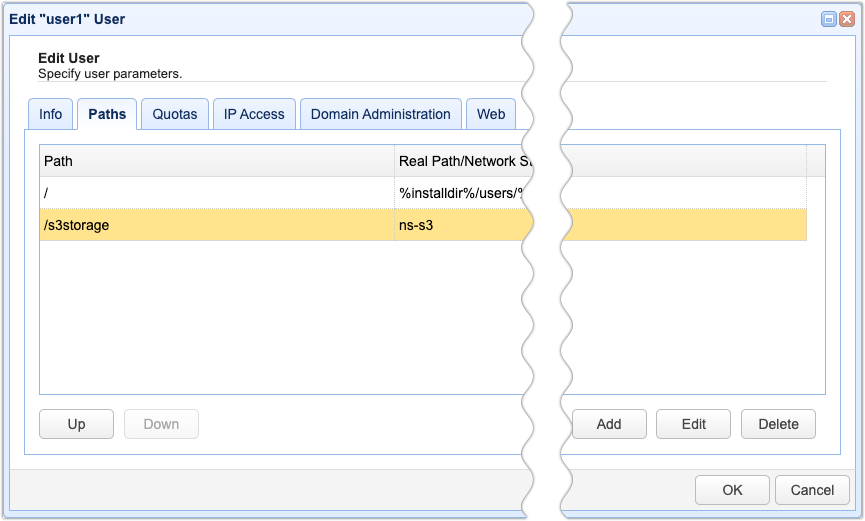
You should then see your newly created virtual path under the Paths tab. Click OK to save your settings.
That’s it! You can start uploading files to S3 via SFTP using the user account whose virtual path you just configured.
Upload files to your S3 bucket via SFTP
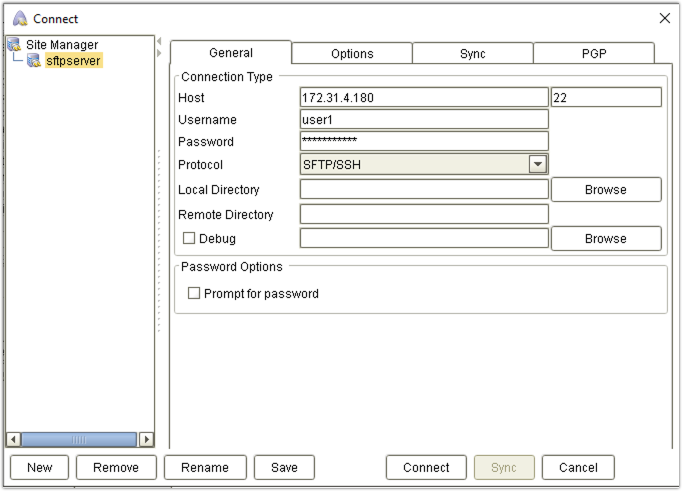
Launch your favorite SFTP client and enter the connection details to your JSCAPE MFT Server SFTP service. I’m using JSCAPE AnyClient by Redwood, a free multi-protocol file transfer client that also supports SFTP.
Enter the SFTP service’s IP address or hostname, your username and its corresponding password. Don’t forget to select the SFTP protocol. Click the Connect button to connect.
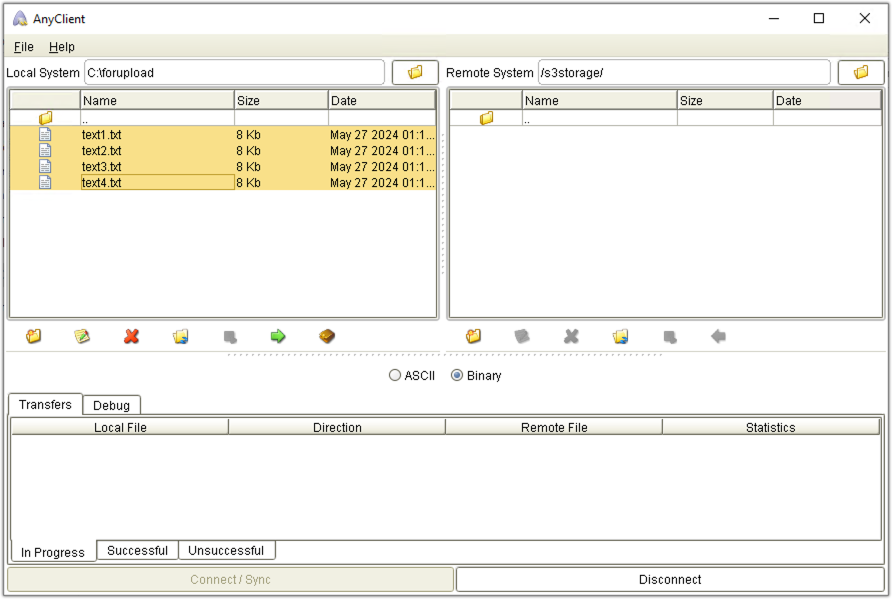
As soon as your SFTP client connects, you should see your local and remote file systems on the screen. If you’re using a command line interface (CLI) SFTP client, you’ll only see one file system at a time. You’ll find a folder with the same name as the virtual path you created earlier in the remote file system. Navigate into that folder.

In the local file system, navigate into the folder that contains the files you want to upload to your S3 bucket folder.
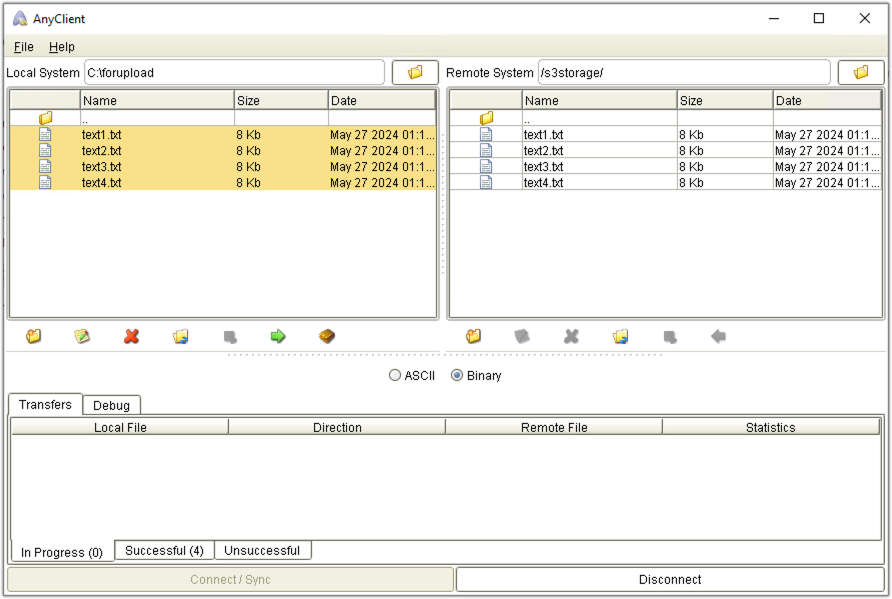
Select the files you want to upload and click the upload button. Barring any unforeseen issues, those selected files should then be uploaded to your S3 bucket folder.
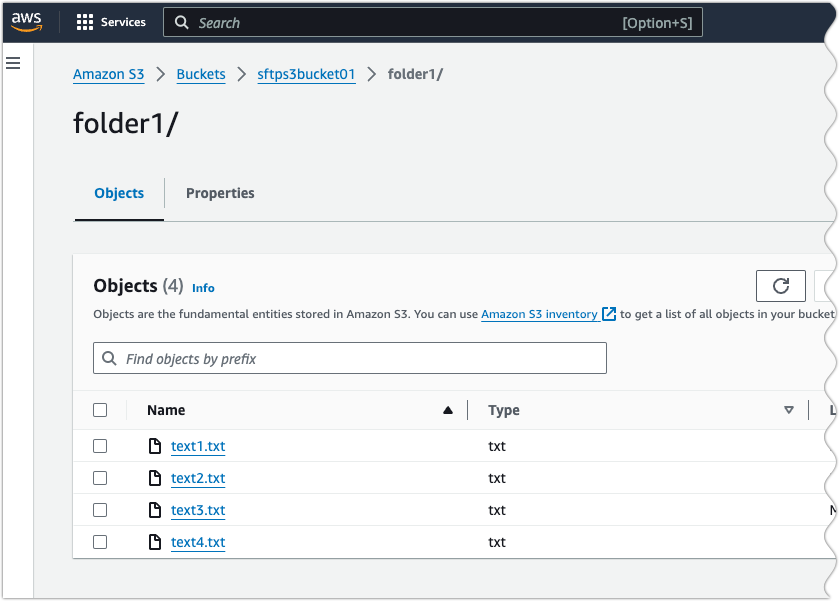
You can verify that the files were actually uploaded to S3 by checking the S3 bucket folder itself through the AWS console.
Try JSCAPE MFT Server
Would you like to try this out yourself? Request a JSCAPE MFT trial now.
Prefer to have someone assist you? Request a demo instead

