It’s never easy to set up an FTP server the moment firewalls get involved. But it gets even more complicated once you start using the secure version of FTP, known as FTPS. In this post, we’ll talk about the problem you’ll usually encounter when your FTPS server is behind a firewall and your client attempts to perform a file transfer using passive mode or PASV.
Let me explain.
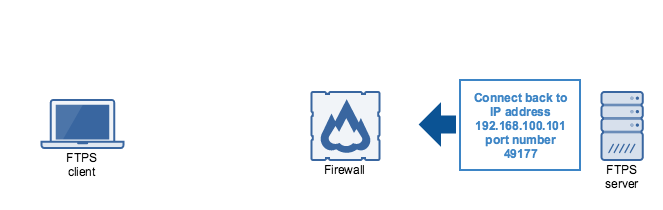
When an FTP/S client wants to conduct a data transfer using Passive Mode, it issues the PASV command. Upon receiving that command, the FTP/S server responds with the server’s IP address and the port number to which it wants the client to connect.

Note: The passive port number calculates to: (192 x 256) + 25 = 49177
Prefer to watch a video version of this blog post instead?
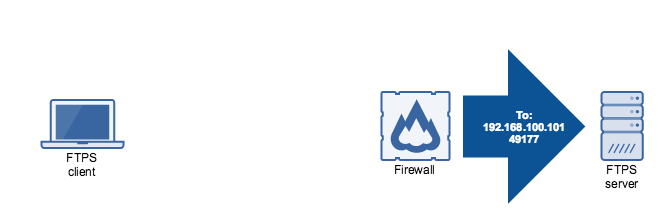
This shouldn’t be a problem for direct connections. But things can get pretty messy once you have a firewall or NAT router in between.
So, let’s say we have an FTPS server sitting behind a firewall. The FTPS server is in an internal network with an internal IP address assigned to it. The client outside the internal network is connecting to the FTPS server via the firewall’s external IP address. We’ll use the term ‘firewall,’ but this applies to NAT routers, reverse proxies, and other routing devices. So now, when the FTPS server responds to the PASV command, its response will specify the FTPS server’s internal IP address and the port number it will be listening on.
What then happens is that when the client, in turn, attempts to connect, it will attempt to connect to that internal IP address. Since the client does not belong to the internal network, it will naturally fail to connect and eventually time out.
In addition, if the port number specified in the response has not been opened on the firewall or routing device, that would also cause the connection to fail.

Of course, modern firewalls, NAT routers, reverse proxies, and other routing devices are smart enough to address this situation. Once they have identified the conversation as FTP and can detect the PASV command, they assume that the client will be connecting back to the FTP server through another port and IP address.
They then dynamically open that port to the FTP server in anticipation of the request from the client software. They also modify the response packet to instruct the client software to connect back at the external IP address, not the FTP server’s internal IP address. Once they receive the client’s request, they make the necessary substitutions.

However, when the packets are encrypted with TLS, as in the case of FTPS, the firewall can’t examine the packets and will have difficulty determining what ports to open and what IP addresses to substitute with. 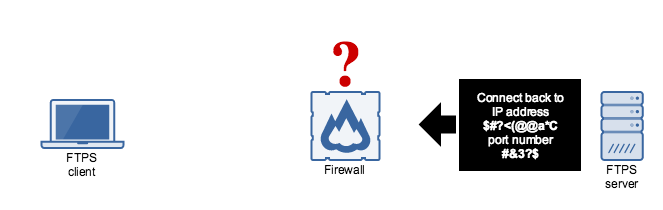 This is what you do to resolve the problem. In your FTPS server, you need to specify a passive IP address and a passive port range. These settings are going to be used when responding to PASV client requests.
The passive IP address should be the external IP address of your firewall, NAT, reverse proxy, or other routing device. On the other hand, the passive port range should be the range of ports you want the FTPS server to be listening on. For this to work, those range of ports should likewise be opened on your firewall.
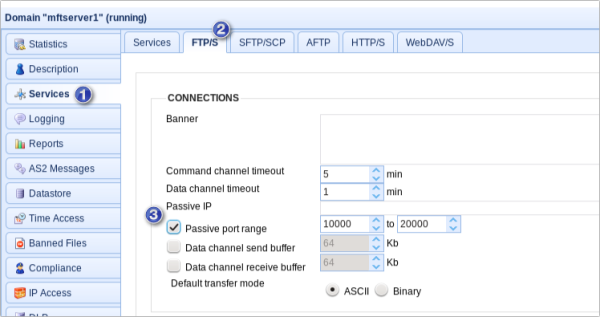
To configure this on JSCAPE MFT Server, do the following. Login to the JSCAPE MFT Server Manager, navigate into the domain on which your FTPS service is running, and then go to the Services module and navigate into the FTP/S tab. Specify the external IP address in the Passive IP field. Tick the “Passive port range” check box and specify a passive port range.
Once you’re done, click Apply. That’s it. Your internal FTPS server will now be ready to respond to PASV mode data transfers. Are you curiousabout how JSCAPE can streamline your FTPS setup and enhance your file transfer security behind firewalls? Schedule a demo today to see JSCAPE MFT Server in action and explore all its capabilities firsthand.
Try this out yourself. Download the free, fully functional evaluation edition of JSCAPE MFT Server.
Download JSCAPE MFT Server Trial
Related articles
Active v.s. Passive FTP Simplified – Understanding FTP Ports
Mapping FTP, FTPS, or SFTP Server User Directories To Samba Shares
Understanding Key Differences Between FTP, FTPS and SFTP
Securing Trading Partner File Transfers w/ Auto PGP Encryption & FTPS
How To Set Up SSL Client Authentication on an HTTPS and FTPS Server
Frequently Asked Questions
What is an FTPS Port?
An FTPS port enables a server to securely authenticate the FTP client and server and encrypt the data exchange between the FTP client and server.
What ports need to be open for FTPS?
When data packets are encrypted by FTPS, the firewall can’t examine the packets and thus will have difficulty determining what ports to open and what IP addresses to substitute with. To resolve this, you can specify a passive IP address and a passive port range on your FTPS server. The passive IP address should be the external IP address of your firewall, NAT, reverse proxy or other routing device. The passive port range should be the range of ports you want the FTPS server to be listening on. For this to work, this range of ports should likewise be opened on your firewall.