

Overview: How to Use an SFTP Client
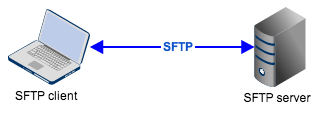
In this tutorial, I'm going to show you how to use an SFTP client to connect with an SFTP server and then upload and download files with it. In addition, I will talk about host keys and how they are used to verify the server's identity. Finally, I will also demonstrate how to load up a private key and take advantage of public key authentication.
The SFTP client I'll be using throughout this article is our platform-independent file transfer client, AnyClient. Aside from SFTP, AnyClient also supports several other file transfer protocols, including FTP, FTPS, HTTP, HTTPS, WebDAV, WebDAVS, Amazon S3, and AFTP. It's totally FREE, so I encourage you to try it out.
Ready now? Let's begin.
Requirements for establishing a connection
When you connect to an SFTP server, you will have to submit the following basic information:
✔ Username - This is the username assigned to your user account on the SFTP server.
✔ Password - The password associated with that username. Depending on how your SFTP server's authentication (login) settings is set up, you may need to enter a password, a private key, or both each time you login.
✔ IP address or hostname - The designated IP address/hostname of the server.
✔ Port number - This is the corresponding port number of the SFTP service. Normally, that number would be 22.
✔ Private key - This is a special file used by the SFTP client to generate a digital signature which is uniquely identified with your user account and recognized by the server (by virtue of the private key's corresponding public key stored on the server). That signature will then be used by the SFTP server to confirm your identity.
About private keys and public key authentication
Now, why would you want to employ a private key when a password can already be used to authenticate a person's identity? Actually, a password is only one way of proving a person's identity. It is a piece of information which, ideally, only the person represented by the username should know.
Unfortunately, passwords can be stolen. Crooks can steal passwords through brute force attacks or through a variety of social engineering (psychological manipulation) techniques.
Sometimes, they even steal users' passwords from other software applications. Because many users reuse their passwords across several applications, crooks only need to obtain a user's password from one application and then apply that password to that user's accounts in other applications, including the SFTP service.
What a private key (and public key authentication in general) does is to provide another way of proving a person's identity. When a user submits his digital signature using his private key, he in effect is presenting something only he, as the authorized owner of the key, should possess. Obviously, the private key file must be kept in a secret location known only to the user.
To distinguish the two, a password is something a user knows, while a private key is something a user has. By combining these two methods (password and public key authentication), you will be able to strengthen your user authentication process considerably.
Connecting to an SFTP server using a password
To connect to an SFTP server that only requires a username and password as login credentials, you would only need to enter the server's IP address or hostname (e.g. 10.0.0.2), the port number (22), and of course, the username and password. If you're using a multi-protocol file transfer client like AnyClient, you would also have to select "SFTP" from the list of supported protocols.
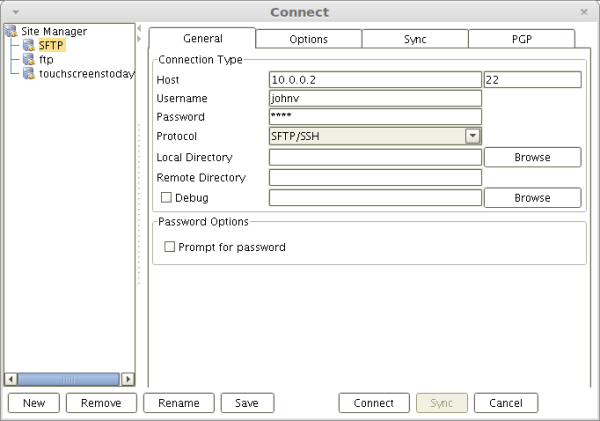
Once you're done entering the needed information, click the "Connect" button. Assuming the connection attempt is successful, one of two things can then happen:
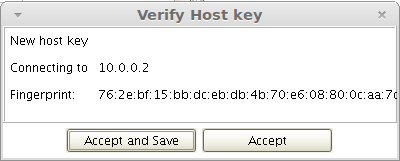
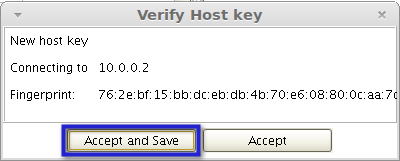
1) If it's the first time you've ever connected to the server, you'll first be asked to verify the server's host key as shown below.
or
2) If it's not your first time to connect and your client recognizes the server's host key (more about host keys below), you'll automatically be granted access into the server.
If it's your first time to connect and you're prompted with the dialog shown earlier, click the Accept and Save button. This will allow your SFTP client to save the SFTP server's host key and use that key to identify the server in future connection attempts.
Understanding Host Keys
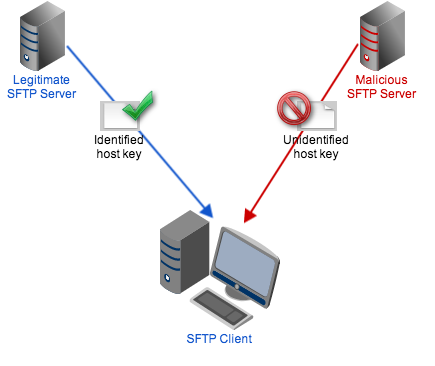
The use of host keys is a feature of the SFTP protocol. Basically, a server's host key fingerprint is unique to each particular server. In other words, it can be used to distinguish one SFTP server to another.
Hence, if in the future, your client attempts to connect to a server believed to be one it has already connected to in the past but then receives a host key that doesn't match the one associated with that server, then it's possible that the machine you're trying to connect to isn't really the server you thought it was. Worse, you could actually be falling for a spoofing attack.
Spoofing is a technique used by attackers to divert your connection to a malicious machine in order to obtain your password. Host keys can be used to counter these attacks.
Connecting to an SFTP Server using a private key
Let's now talk about logins that implement public key authentication to authenticate users. In this kind of logins, users are required to submit a digital signature using their private key.
Note: The keys being referred to in this section is different from the host keys discussed earlier.
To submit your digital signature, simply load your private key file unto the SFTP client. In AnyClient, you can do this in the Options tab.
First, tick the checkbox labeled Use public key authentication and then navigate to your SFTP private key file.
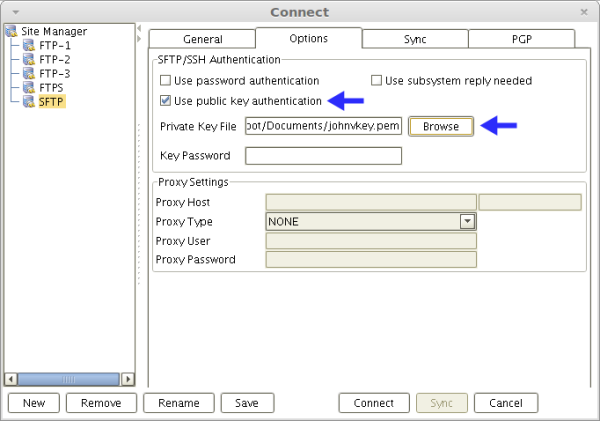
After making sure you've entered all other pertinent information (i.e., Host, Port number, username, protocol) found in the General tab, click the Connect button.
If all goes well, you should encounter the Verify Host Key dialog shown earlier. Again, click Accept and Save to proceed.
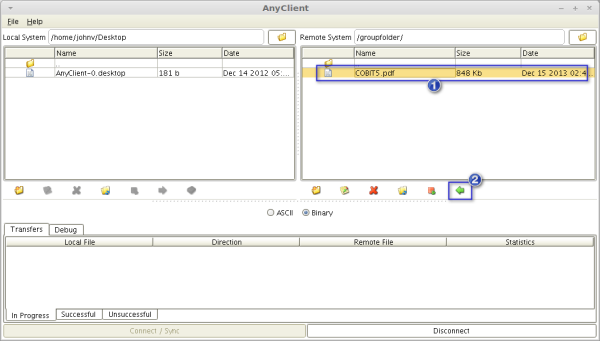
Uploading and downloading files with an SFTP client
You'll then come face to face with two panes. The left pane will be populated with the files and folders/directories of your local system (where your SFTP client is running), and the right pane with those files and folders/directories on your SFTP server (a.k.a. remote system) that you have access to.

You can navigate into a subdirectory by double-clicking on it. To navigate up to a directory's parent directory, just click the ellipses (..) at the top of the pane. To upload files unto the current remote directory, select the files in your local system that you want to upload and then click the Upload button.
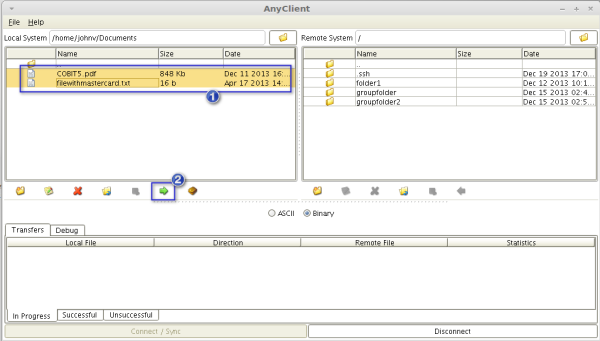
Similarly, to download files unto the current local directory, select the files you want to download and click the Download button.
That's it. For more tips like this, follow us on Twitter! Follow @jscape
How to test an SFTP Server for FREE
To come up with this post, we paired AnyClient with JSCAPE MFT Server - a Managed File Transfer Server that allows you to upload and download files via SFTP, FTPS, FTP, and other file transfer protocols. JSCAPE MFT Server comes with a FREE evaluation edition which you can download now.
Download JSCAPE MFT Server Trial