
Overview
PGP encryption can add another layer of protection to a trading partner file transfer already secured by FTPS. It can also provide data-at-rest encryption as soon as the file arrives at the other end. In this post, we’ll show you how to set up a fully automated file transfer secured by OpenPGP and FTPS using JSCAPE MFT Server triggers.
What we’d like to do
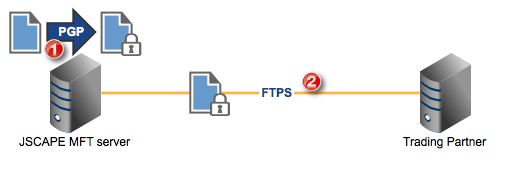
Does that look like something you could use? Here are the steps to achieve that.
1. Import your trading partner’s PGP public key
Before you can PGP encrypt a file which your trading partner can later on decrypt at the other end, you’ll first need to obtain your trading partner’s PGP public key. Once you have that, you can then import it to your managed file transfer server so it can be called into play whenever a file needs encryption. Here’s how you’d do the import.
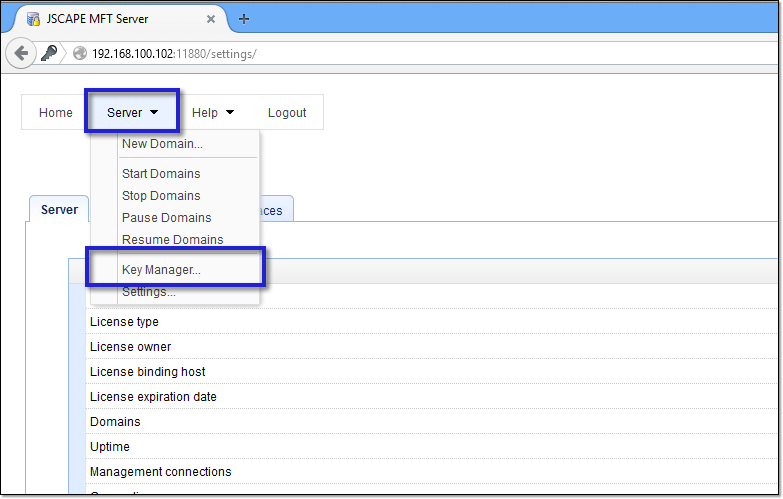
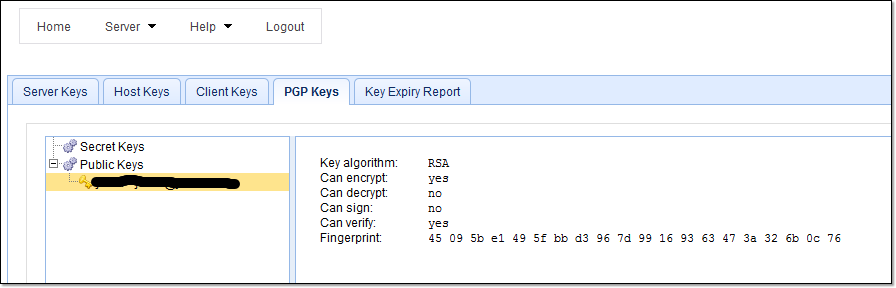
Load up your JSCAPE MFT Server Manager and then go to Server > Key Manager.
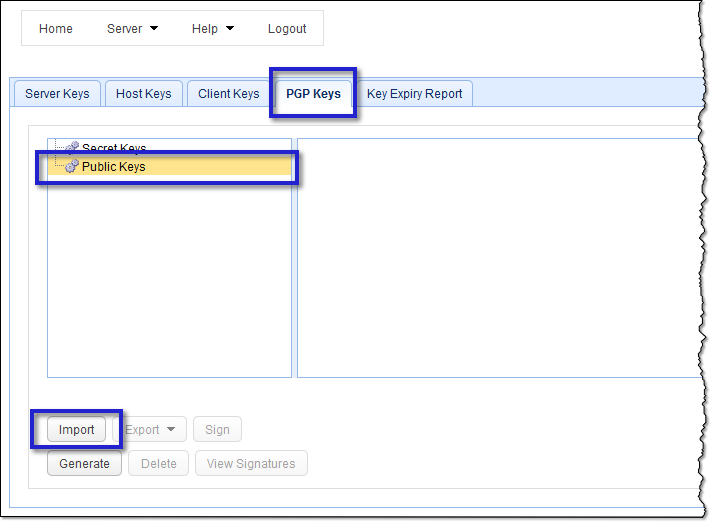
Next, go to the PGP Keys tab, select Public Keys, and then click the Import button.
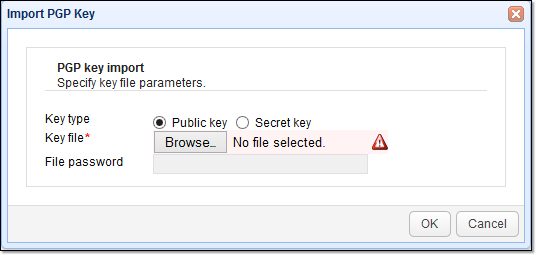
After that, choose Public key for the Key type, click Browse, and then navigate to the folder containing the public key file you got from your trading partner. Select the file and then click OK.
As soon as you do that, you should then find your newly imported public key in your collection of public keys. Take note of this key’s name because you’ll need it later.
2. Establish a FTPS Trading Partner connection
Now, go to the domain where you want to enable automatic PGP encryption.

Before you start enabling this domain with automatic PGP encryption, you need to verify first whether its FTPS service has already been activated. Go to the Services module and then see whether FTP explicit SSL, forced explicit SSL, or implicit SSL is included in the list of protocols. To understand the difference between these three, read the article “Choosing Between SSL Implicit, Explicit, and Forced Explicit Modes“.
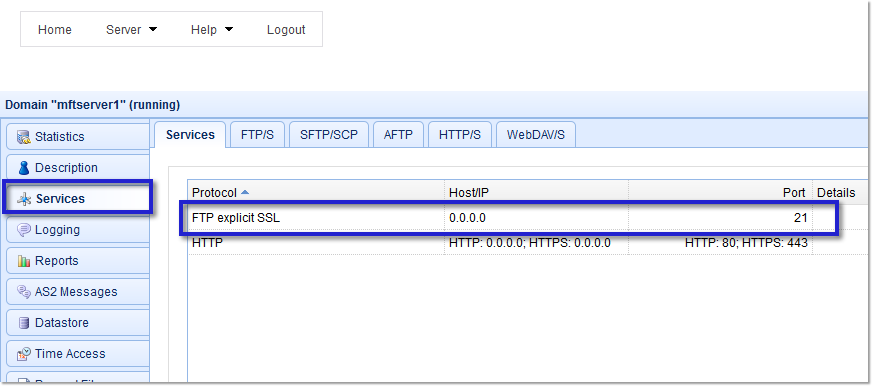
If none of these three exist in your list of active protocols, you’ll need to activate one of them first. Read the article “How to do SSL File Transfers” to get an idea how it’s done. As soon as you’ve activated FTPS, you should proceed to set up a Trading Partner.
To learn how to set up a Trading partner, read the article “Using Trading Partners and Their Benefits“. You can also watch this 2-part video: “Using Trading Partners In JSCAPE MFT Server“
Once you’ve got your FTPS service and your trading partner ready, you can then proceed with creating a trigger that would automatically encrypt a file with PGP and then send it via that FTPS trading partner connection.
3. Schedule the time for your auto-PGP encryption and FTPS transmission to run
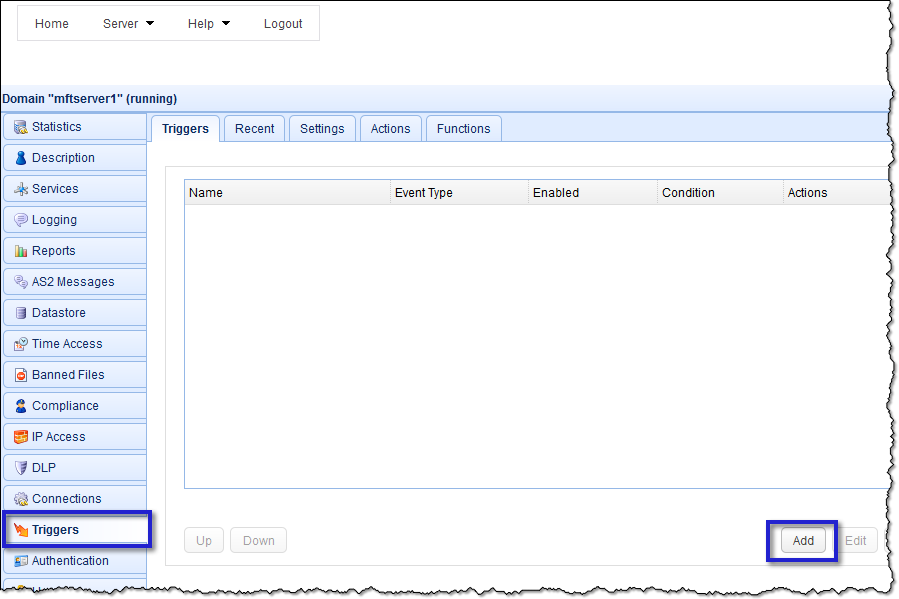
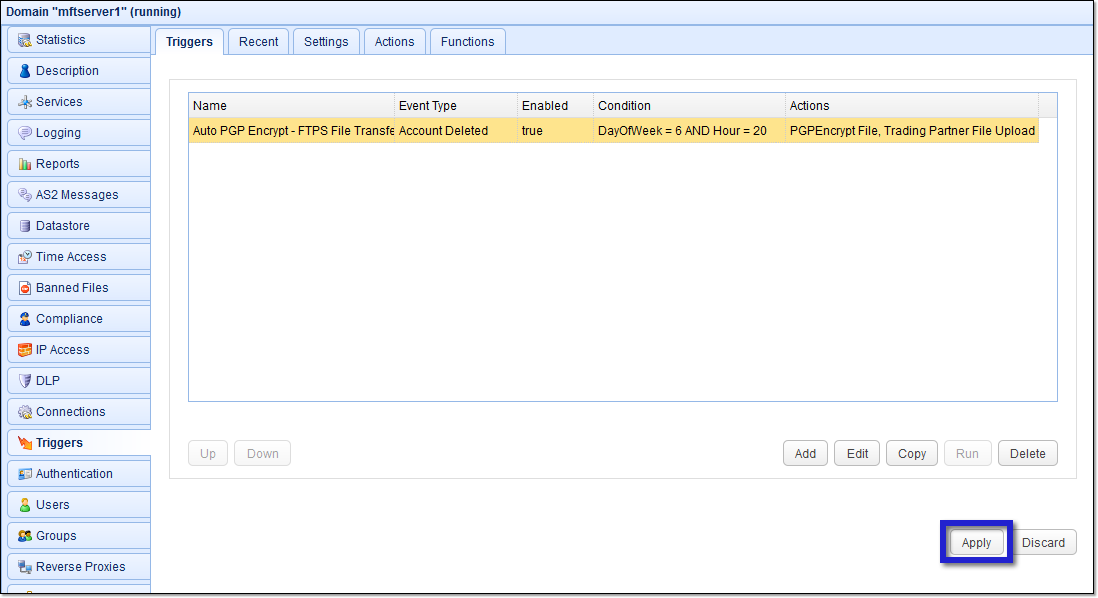
Start by creating a new trigger. Go to the Triggers module and then click Add.
Next, select the Current Time Event type and then (optionally) enter a description for this particular trigger. Click Next.
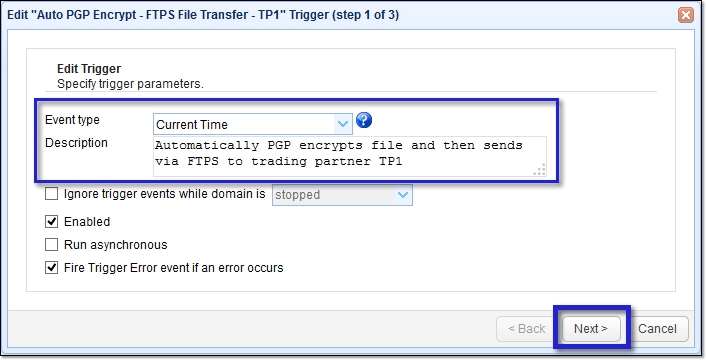
The Current Time event fires every minute. However, you may want your desired trigger actions (i.e., to encrypt and send via FTPS) to execute only at certain times. To make that happen, specify the schedule for the trigger actions to execute by entering time variables and then assigning values to them. Better yet, just click the Time Expression button and enter values there. For example, if you want your trigger to fire every Friday at 8 PM, enter the following:
Hour = 20
Minute = 0
DayOfWeek = 6
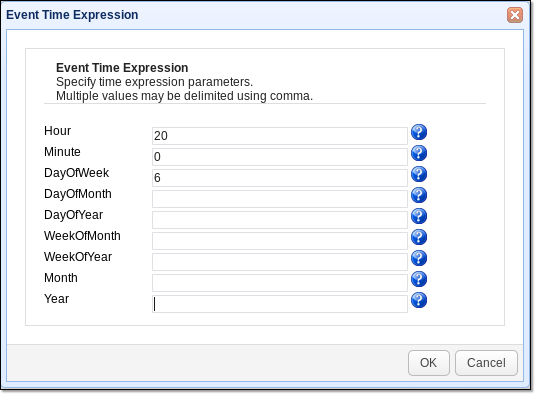
After checking the values in the Trigger Conditions Expression box, click Next to proceed.

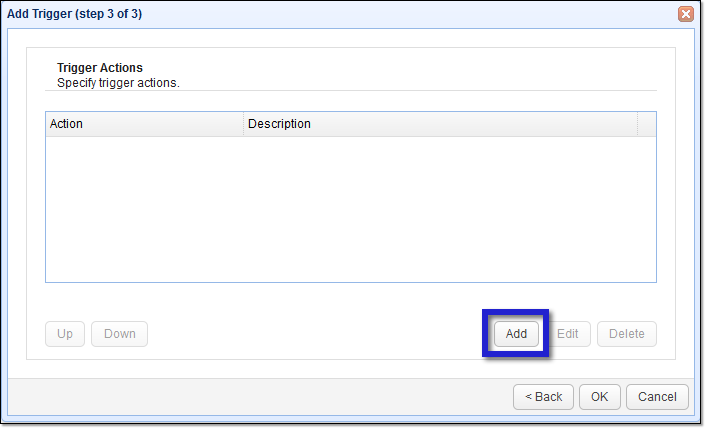
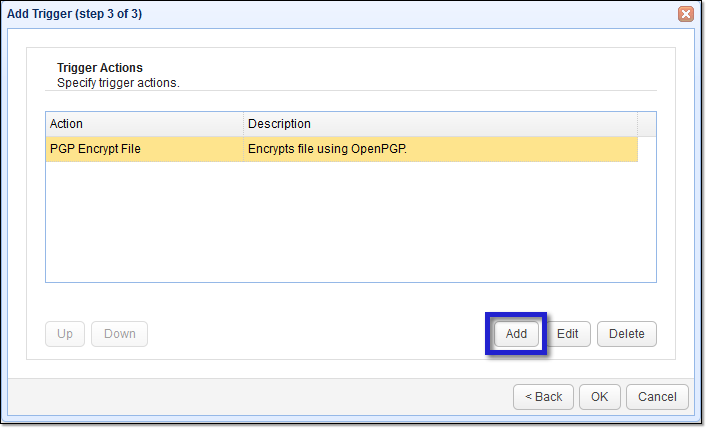
4. Add the trigger action for PGP encryption
You’re now ready to add your desired trigger actions. Click the Add button to add the first trigger action.
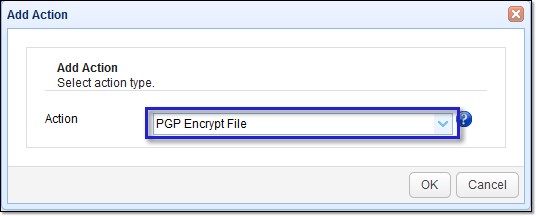
Select the PGP Encrypt File trigger action.
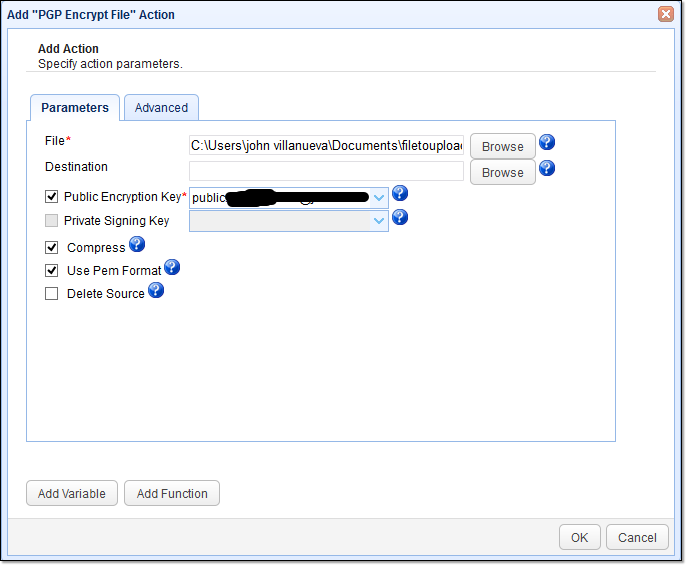
Once the PGP Encrypt File trigger action parameters come up, enter the necessary settings. You’ll want to specify the file you want to encrypt. Just click the browse button and select the file.
The next parameter you may need to specify is the Destination field. This is the path where you want the encrypted file to be placed. If you leave the Destination field blank, the encrypted file will be placed in the same directory as the source file but with a .pgp extension added to it. So if the filename is “filetoupload.txt”, the encrypted file will be “filetoupload.txt.pgp”.
Some people don’t want that pgp extension to be included. If that’s what you want, just specify a different directory, use the same filename, and remove the .pgp. So, for example, you can enter “C:\Users\john villanueva\Documents\encryptedfiles\filetoupload.txt”
There are several variables you can use if you click on the Variables button. For example, depending on the event type, you can use a variable that already holds the path or filename of the file you want to encrypt. This can be useful if the file you want to encrypt varies.
The next important thing you need to specify is the Public Encryption Key. Tick the Public Encryption Key check box and select the public key you imported earlier.
Click OK when done.
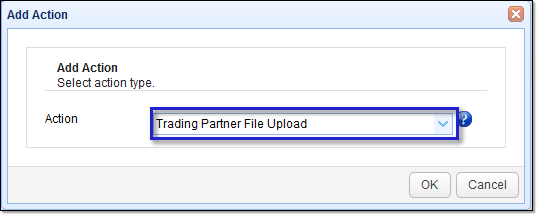
5. Add the trigger action for transmitting via FTPS
Now you’re ready to add the second trigger action that will transmit your PGP-encrypted file via FTPS. Click the Add button to proceed.
Select the Trading Partner File Upload trigger action.
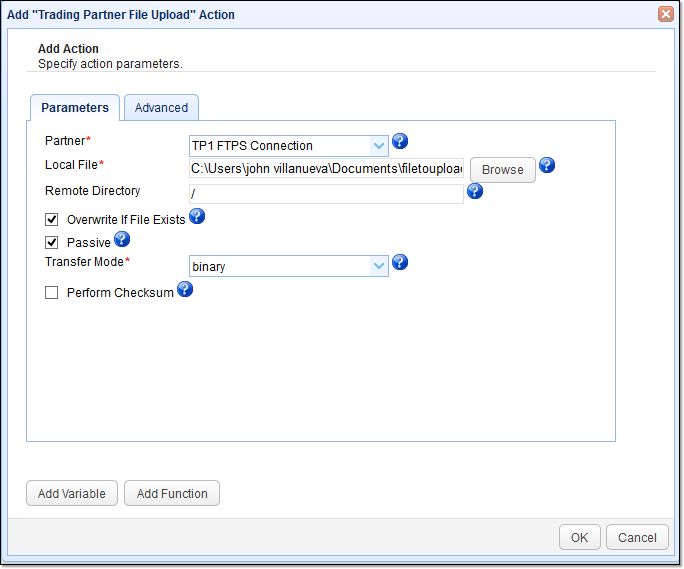
From the Partner drop-down list box, select the specific trading partner you want to use. Remember, Trading Partners in the context of JSCAPE MFT Server already contain all the necessary information that define a particular trading partner connection, including transfer protocol, username, password, port number, host/IP address, etc.
So, at this point, all that’s left to specify is the file you want to upload (Local File) and the directory on the remote server. In this example, we just want the file to be uploaded to the user’s root directory (relative path). That’s why we simply used the “/” (forward slash).
Click OK when done.
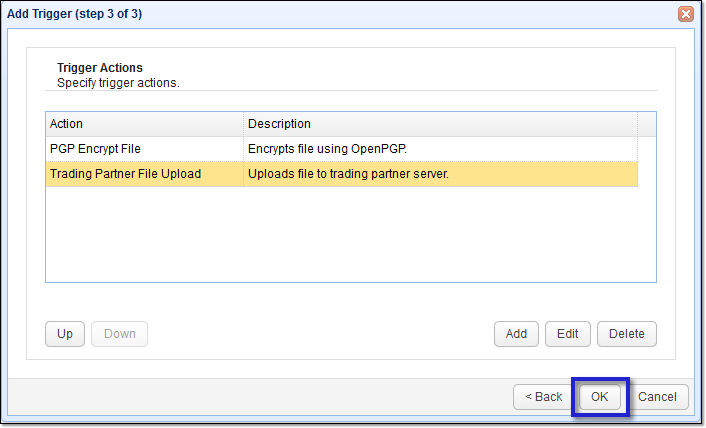
You should then see the second trigger action placed right below the first trigger action. This basically means, the PGP encryption will be executed first and the FTPS transmission will follow. Click OK.
6. Finalize the trigger creation
Finalize this trigger creation process by clicking the Apply button.
That’s it. To try this out yourself, download the free, fully-functional evaluation edition of JSCAPE MFT Server.
Download JSCAPE MFT Server Trial