

Overview
Let's say you want to install an SSH FTP server (SFTP) on a Linux machine devoid of a GUI. However, after installation, you don't want to configure it (add users, create keys, enable public key authentication, choose algorithms, etc.) locally, moreso via the SFTP client. Instead, you want this SFTP server to be configured remotely through a graphical Web user interface. This is how we recommend you do it.
For our Linux machine, we'll be using Ubuntu Server. The default installation of this Linux distro doesn't have any graphical packages like X, Gnome, or KDE, so we can only do things on the command line - at least before the server becomes accessible via the Web GUI. Well, that's what we want, right?
The secure file transfer protocol service we'll be installing on our Ubuntu Server is actually part of JSCAPE MFT Server, a managed file transfer server that comes with loads of built-in capabilities like automation, multi-protocol support, multi-factor authentication options, password policies, encryption key management, reporting, scheduling, email notifications, and others - all configurable from a nice administrative Web graphical user interface.
We know other open source servers such as OpenSSH can be easily installed on Ubuntu Server but these don't come with those additional features we just mentioned. JSCAPE provides functionality that simplifies file transfers, with advanced security for sensitive data transfers regardless of protocol or operating system. That's why we suggest you just set aside OpenSSH for now and check this out.
Because JSCAPE MFT Server runs on Java, we'll be including the steps to install Java in this tutorial. Let's begin.
Installing Java
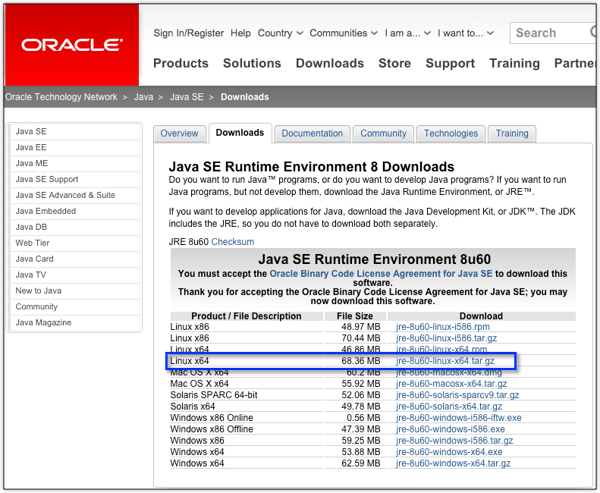
Download files for the latest version of the JRE from Oracle here. Follow the instructions on the screen. You'll want to download the tar.gz file for Linux. As of this writing, the latest version of Ubuntu Server, which is the one we're using, is 14.04.3 LTS (Long Term Support). Since it's a 64-bit OS, we'll need to download the 64-bit version of the JRE.
The installer for that when we wrote this article was jre-8u60-linux-x64.gz.
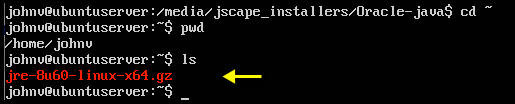
After downloading, copy the JRE tar file to a temporary location on the server. In our case, we copied it to our user account's home directory. To do that, we entered:
sudo cp jre-8u60-linux-x64.gz ~
Where the tilde (~) stands for "home".
![]()
This screenshot simply shows you that the jre was successfully copied to our home directory.
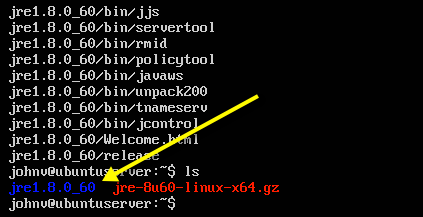
After the JRE tar file has been copied to the temporary directory, the next step is to untar (uncompress) the file. This can be done by executing the tar command in this manner:
sudo tar -zxvf jre-8u60-linux-x64.gz
![]()
That should unpack the tar file and store the contents in a directory named jre1.8.0_60.
As mentioned earlier, our home directory will just serve as a temporary location for our JRE files. We need to move these files to their proper place - in their own directory under the /opt directory. First, create the destination directory. We want to place the jre files under the directory named "64", which we also want to place inside a directory named "java". That's just us. You can use any directory name(s) you want.
We want to create those directories by running the mkdir command:
sudo mkdir -p -v /opt/java/64

Now that we have a directory that would house our jre files, let's move those files there. Just issue the mv (move) command:
sudo mv -v jre1.8.0_60 /opt/java/64

Lastly, we'll want to make Java accessible from anywhere in the system. To do that, we execute the update-alternatives command. It's a nifty tool that comes with Ubuntu linux distros:
sudo update-alternatives --install "/usr/bin/java" "java" "/opt/java/64/jre1.8.0_60/bin/java" 1
That should be written in one line.

If that completes successfully, you would have already installed Java and made it accessible to your JSCAPE MFT server (after you install it, of course). To verify whether Java was in fact installed, just run the command:
java -version
Here, we can see that we've installed Java 1.8 or Java v. 8.

Now it's time to install our SFTP server.
Installing The SFTP Server
First, let's prepare the directory that would hold our JSCAPE MFT Server installation. Let's put it under the /opt directory and name it "JSCAPE". Again, you can give it whatever name you want.
![]()
Now, download a copy of JSCAPE MFT Server by clicking that button below. If you click the DOWNLOAD NOW button in the succeeding page, you'll be able to download a FREE, fully-functional evaluation edition of JSCAPE MFT Server. Give it a try.
Download the zip console based installer for Linux since that's the installer we'll be using in this tutorial.
After that, navigate to the directory that holds your downloaded JSCAPE MFT Server installer and then copy the file into the newly created installation directory. In our case, that would be /opt/JSCAPE.
![]()
Here's a screenshot showing the installer sitting inside our /opt/JSCAPE directory.

We'll need to unzip that installer. In case you don't have the unzip tool installed yet, install it first by running apt-get:
sudo apt-get install unzip
![]()
After installing that, run the unzip command:
sudo unzip install.zip
![]()
That should extract all JSCAPE MFT Server files into a directory named JSCAPE_MFT_Server.

So, now you'll have all your JSCAPE MFT Server files inside the directory /opt/JSCAPE/JSCAPE_MFT_Server. Let's have a look inside.
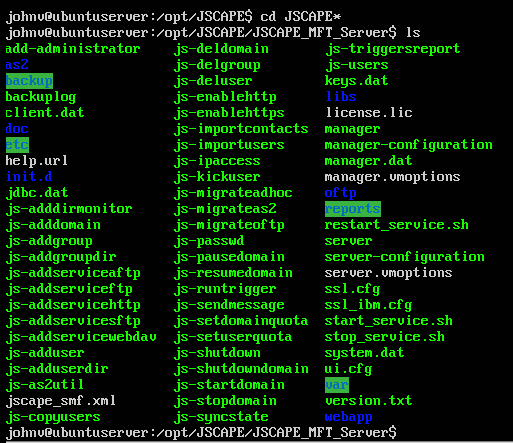
The first thing to do after installation, is to configure this server's admin interfaces.
Just run the command:
sudo ./server-configuration -host 0.0.0.0 -port 10880 -rest.host 0.0.0.0 -rest.port 11880 -user admin -password admin
Again, that's one line.
Let me orient you with the elements of that command:
- The first 0.0.0.0 is the IP address of the Java-based admin interface. 0.0.0.0 just means "all network interfaces on this machine". You can replace this with your own Linux server's IP address or hostname.
- 10880 is the port on which the Java-based admin interface will be listening. You can also replace this with a different port number if you want. For now, just leave it as is.
- The second 0.0.0.0 is the IP address of the Web-based admin interface. Again, you can replace this with your own Linux server's IP address or hostname.
- 11880 is the port on which the Web-based admin interface will be listening. This too can be replaced but just leave it as is for now.
- The first "admin" is just our admin account's username. Again, it's replaceable.
- The second "admin" is that account's corresponding password. That one should be replaced!
Here's how it looked on our Linux box:

In our setup, one interface will run locally and can be accessed on port 10880 via a Java-based admin interface through that file named "manager" (see the screenshot showing the list of files inside the/opt/JSCAPE/JSCAPE_MFT_Server directory). Note: We can't use that because we don't have a graphical user interface on our Ubuntu server.
What we can use though is the administrative Web interface. This Web interface can be accessed remotely on port 11880. Take note of that port number because we'll be needing that later.
Time to power up our server:
sudo ./start_service.sh
![]()
You now have JSCAPE MFT Server running on your Linux machine. Your secure FTP server will be running off of that. We can now say goodbye to this machine (and the command line) and head out to any desktop that can access this machine from the network.
Also, you will want to know what IP address you'll be connecting to, so run the "ifconfig" command before hopping onto another computer. In our case, it's 192.168.100.102.
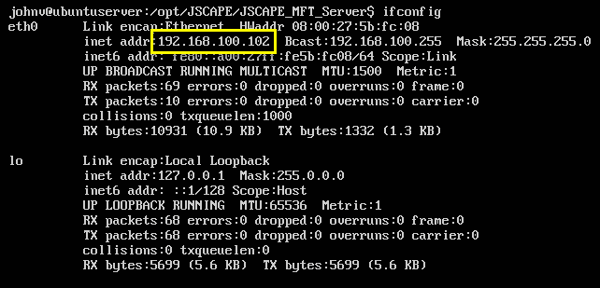
So, there are two things to remember to gain access to your SSH server: the IP address and the port number. In our case, that's 192.168.100.102 and 11880, respectively.
Setting Up The SFTP Server Remotely Via The Administrative Web Interface
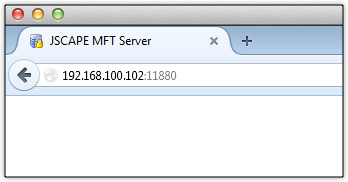
Already in front of a computer with a desktop GUI? Great! Fire up your favorite Web browser (Chrome, Firefox, Safari, Internet Explorer, etc.) and enter the IP address and port number you noted earlier.
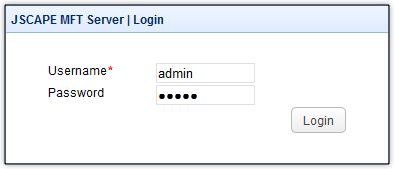
If everything goes well, you should see the login screen. Enter the admin username and password and then click the Login button.
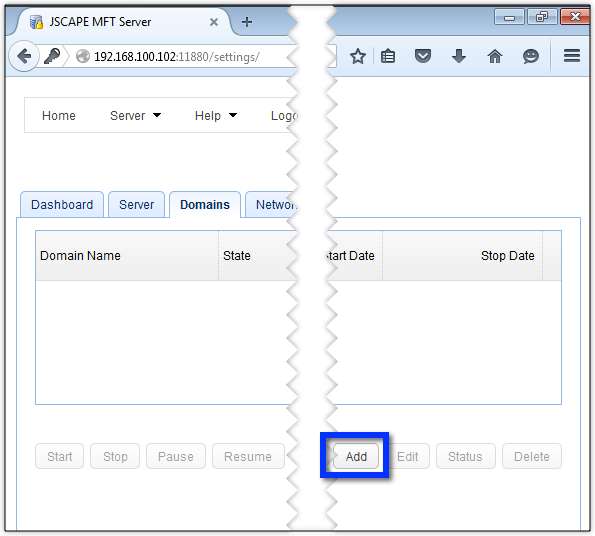
JSCAPE MFT Server will allow you to create multiple domains. Your SFTP service will be running on a domain, so let's create a domain first. Just click the Add button.
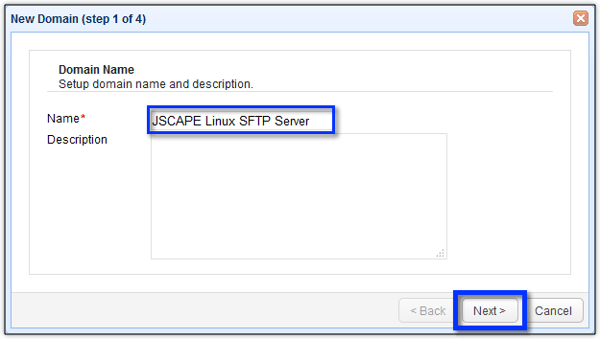
Give the domain a descriptive name (e.g. "JSCAPE Linux SFTP Server") and then click Next.
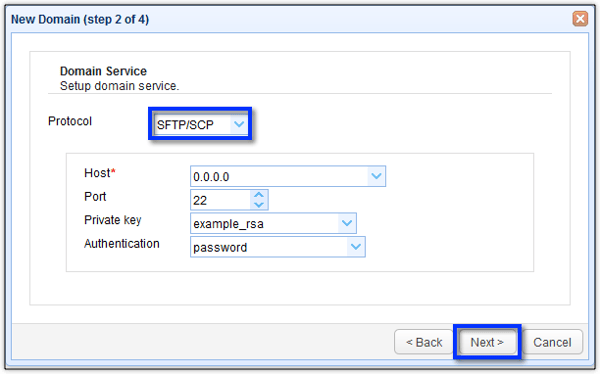
The next step is where you'll get to choose the initial network protocol that will be running on this server. Expand the the drop-down list named Protocol. As you'll see when you expand that, this server supports several other protocols. For now, let's just select SFTP/SCP. Keep the rest of the default values for now and just click Next to proceed.
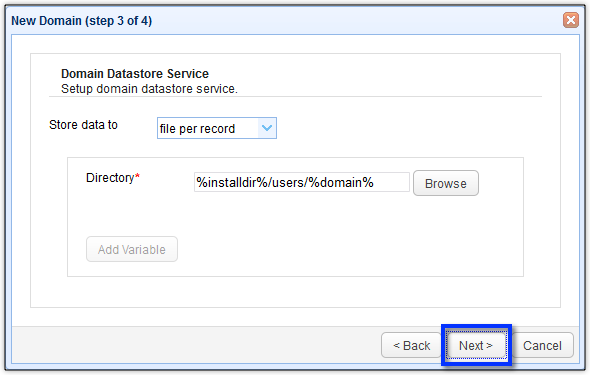
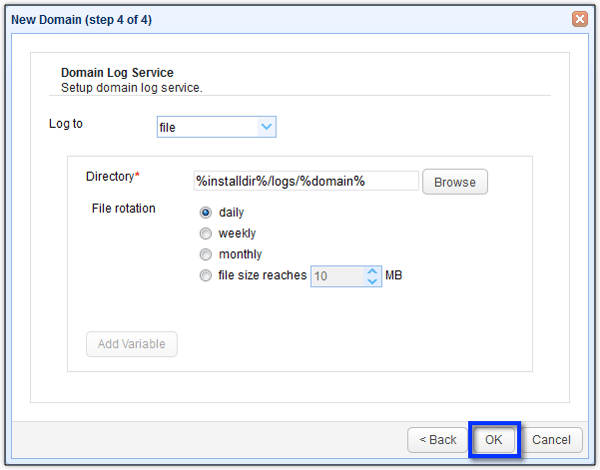
Again, just leave the default values and click Next.
Same here. Click OK to finalize the initial set up. For more details, refer to the documentation.
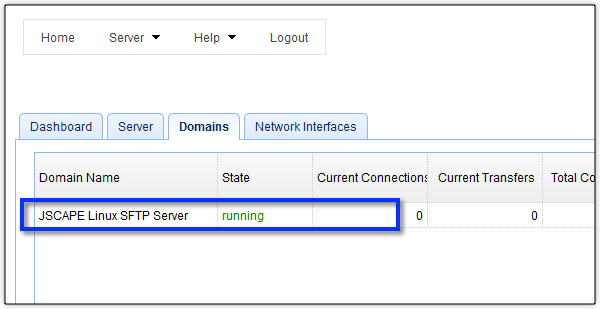
You now have your SFTP server running and ready for further configuration. Double-click on the domain name to see what's inside. You can also select it and click the Edit button (not visible from here, sorry!).
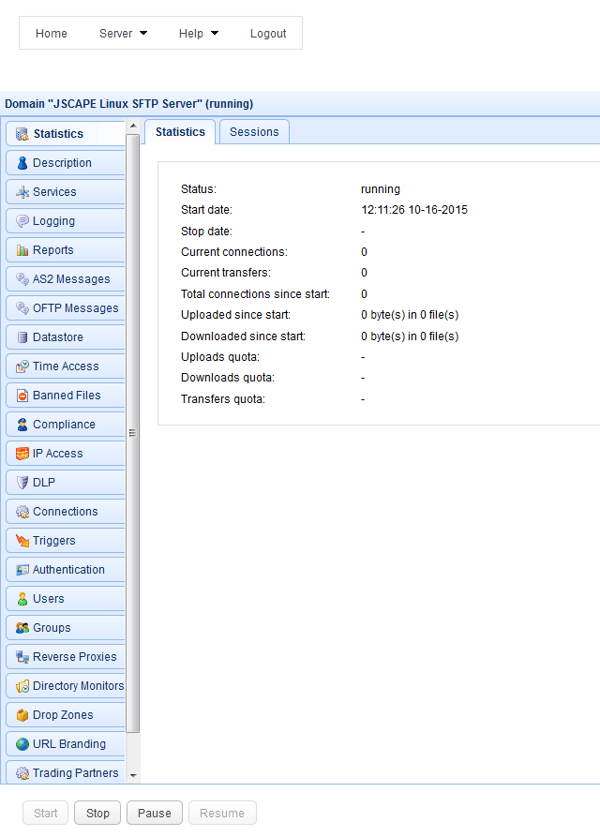
Here's a peek of what's inside.
You can now set up your Linux SFTP server through a Web interface. If you need instructions for adding users, transferring files, creating server keys, enabling public key authentication, or setting up SFTP algorithms, we'll post those too.
Get Your Free Trial
Would you like to try this yourself? JSCAPE MFT Server is platform-agnostic and can be installed on Microsoft Windows, Linux, Mac OS X and Solaris, and can handle any file transfer protocol as well as multiple protocols from a single server. Additionally, JSCAPE enables you to handle any file type, including batch files and XML. Download your free 7-day trial of JSCAPE MFT Server now.
Related Content
How To Install An SFTP Server On Windows
Guide On How To Set Up An SFTP Server